Seawise Documentation for Kubernetes Backups with Velero
Complete backup and restore management system for Kubernetes, OpenShift, Velero and OADP
About Seawise
Seawise is a web application developed to facilitate the creation, management, scheduling and restoration of Kubernetes resource backups using Velero. With an intuitive interface and multi-language support, Seawise provides complete control over your backups, including user management, detailed reports and integration with different storage providers.
Key Features
- Backup Management: Create, list, view and delete backups
- Intelligent Scheduling: Configure automatic backups with cron jobs
- Flexible Restore: Restore full or partial backups with ease
- Interactive Dashboard: View the status of all your backups in real time
- User Management: Authentication system with different permission levels
- Detailed Reports: Track backup history and statistics
- Multi-language: Support for Portuguese and English
- Storage Configuration: Integration with AWS S3, MinIO and other compatible providers
Quick Installation
Latest version: v1.7.1 | All versions
Choose your platform:
Rancher
# Set the version (check latest at: https://github.com/shwcloudapp/seawise-backup/releases/latest)
export CHART_VERSION=1.7.1
export STORAGE_CLASS=storage_class_name
export CLUSTER_HOST_NAME=host_name

helm upgrade --install seawise-dashboard \
  https://github.com/shwcloudapp/seawise-backup/releases/download/v${CHART_VERSION}/seawise-dashboard-${CHART_VERSION}.tgz \
  -n seawise-app --create-namespace \
  --set ingress.enabled=true \
  --set ingress.hosts[0].host=${CLUSTER_HOST_NAME} \
  --set 'ingress.hosts[0].paths[0].path=/' \
  --set 'ingress.hosts[0].paths[0].pathType=Prefix' \
  --set persistence.storageClassName=${STORAGE_CLASS}
OpenShift
# Set the version (check latest at: https://github.com/shwcloudapp/seawise-backup/releases/latest)
export CHART_VERSION=1.7.1
export STORAGE_CLASS=storage_class_name

helm upgrade --install seawise-dashboard \
  https://github.com/shwcloudapp/seawise-backup/releases/download/v${CHART_VERSION}/seawise-dashboard-${CHART_VERSION}.tgz \
  -n seawise-app --create-namespace \
  --set app.veleroNamespace=openshift-adp \
  --set route.enabled=true \
  --set persistence.storageClassName=${STORAGE_CLASS}
OpenShift via Operator (OperatorHub)
Seawise is a Red Hat Certified Operator available in the in-cluster OperatorHub. This is the recommended path on OpenShift — the Operator installs and manages the dashboard for you, with automatic upgrades.
1. In the OpenShift console: Operators → OperatorHub, search for Seawise Backup Dashboard and click Install (keep the defaults).
2. Create a Seawise instance (under Installed Operators → Create instance, or via CLI):
oc new-project seawise-app

oc apply -f - <<'YAML'
apiVersion: backup.seawise.cloud/v1alpha1
kind: Seawise
metadata:
  name: seawise-dashboard
  namespace: seawise-app
spec:
  replicaCount: 1
  image:
    repository: quay.io/marcellshwcloud/seawise-backup-dashboard
    tag: v1.7.1-ubi
  app:
    veleroNamespace: openshift-adp        # where OADP/Velero is installed
  persistence:
    enabled: true
    accessMode: ReadWriteOnce
    size: 1Gi
    storageClassName: "nfs-storage-class" # set your cluster's StorageClass
  service:
    port: 80
    targetPort: 8080
  route:
    enabled: true
YAML
⚠️ Set persistence.storageClassName to an existing StorageClass (oc get storageclass); without a valid default, the PVC stays Pending and the pod won't start.
Access via Route: oc get route -n seawise-app seawise-dashboard. 🔐 Default login is admin / admin123 — change the password on first login.
Kubernetes
# Set the version (check latest at: https://github.com/shwcloudapp/seawise-backup/releases/latest)
export CHART_VERSION=1.7.1
export STORAGE_CLASS=storage_class_name
export CLUSTER_HOST_NAME=host_name

helm upgrade --install seawise-dashboard \
  https://github.com/shwcloudapp/seawise-backup/releases/download/v${CHART_VERSION}/seawise-dashboard-${CHART_VERSION}.tgz \
  -n seawise-app --create-namespace \
  --set ingress.enabled=true \
  --set ingress.className=nginx \
  --set "ingress.hosts[0].host=${CLUSTER_HOST_NAME}" \
  --set 'ingress.hosts[0].paths[0].path=/' \
  --set 'ingress.hosts[0].paths[0].pathType=Prefix' \
  --set persistence.storageClassName=${STORAGE_CLASS}
Verify Installation
kubectl get pods -n seawise-app
kubectl get ingress -n seawise-app  # or: oc get route -n seawise-app
Update
# Set the new version
export CHART_VERSION=1.7.1

helm upgrade seawise-dashboard \
  https://github.com/shwcloudapp/seawise-backup/releases/download/v${CHART_VERSION}/seawise-dashboard-${CHART_VERSION}.tgz \
  -n seawise-app --reuse-values \
  --set image.tag=v${CHART_VERSION}
Uninstall
helm uninstall seawise-dashboard -n seawise-app
kubectl delete pvc -n seawise-app seawise-dashboard-pvc  # Optional: deletes data
Troubleshooting
Pod not starting
kubectl logs -n seawise-app -l app.kubernetes.io/name=seawise-dashboard
kubectl describe pod -n seawise-app -l app.kubernetes.io/name=seawise-dashboard
Velero not found
kubectl get deployment --all-namespaces | grep velero
# Update: --set app.veleroNamespace=CORRECT-NAMESPACE
No URL (Ingress/Route)
# Port-forward to test
kubectl port-forward -n seawise-app svc/seawise-dashboard 8080:80
# Access: http://localhost:8080
Detailed Installation Guides
Simple step-by-step guides for each platform:
- 📖 INSTALL.md - Quick installation (3 commands)
- 🐄 RANCHER-INSTALL.md - Rancher with Traefik/NGINX
- 🔴 OPENSHIFT-INSTALL.md - OpenShift with OADP
Authentication and Access Control
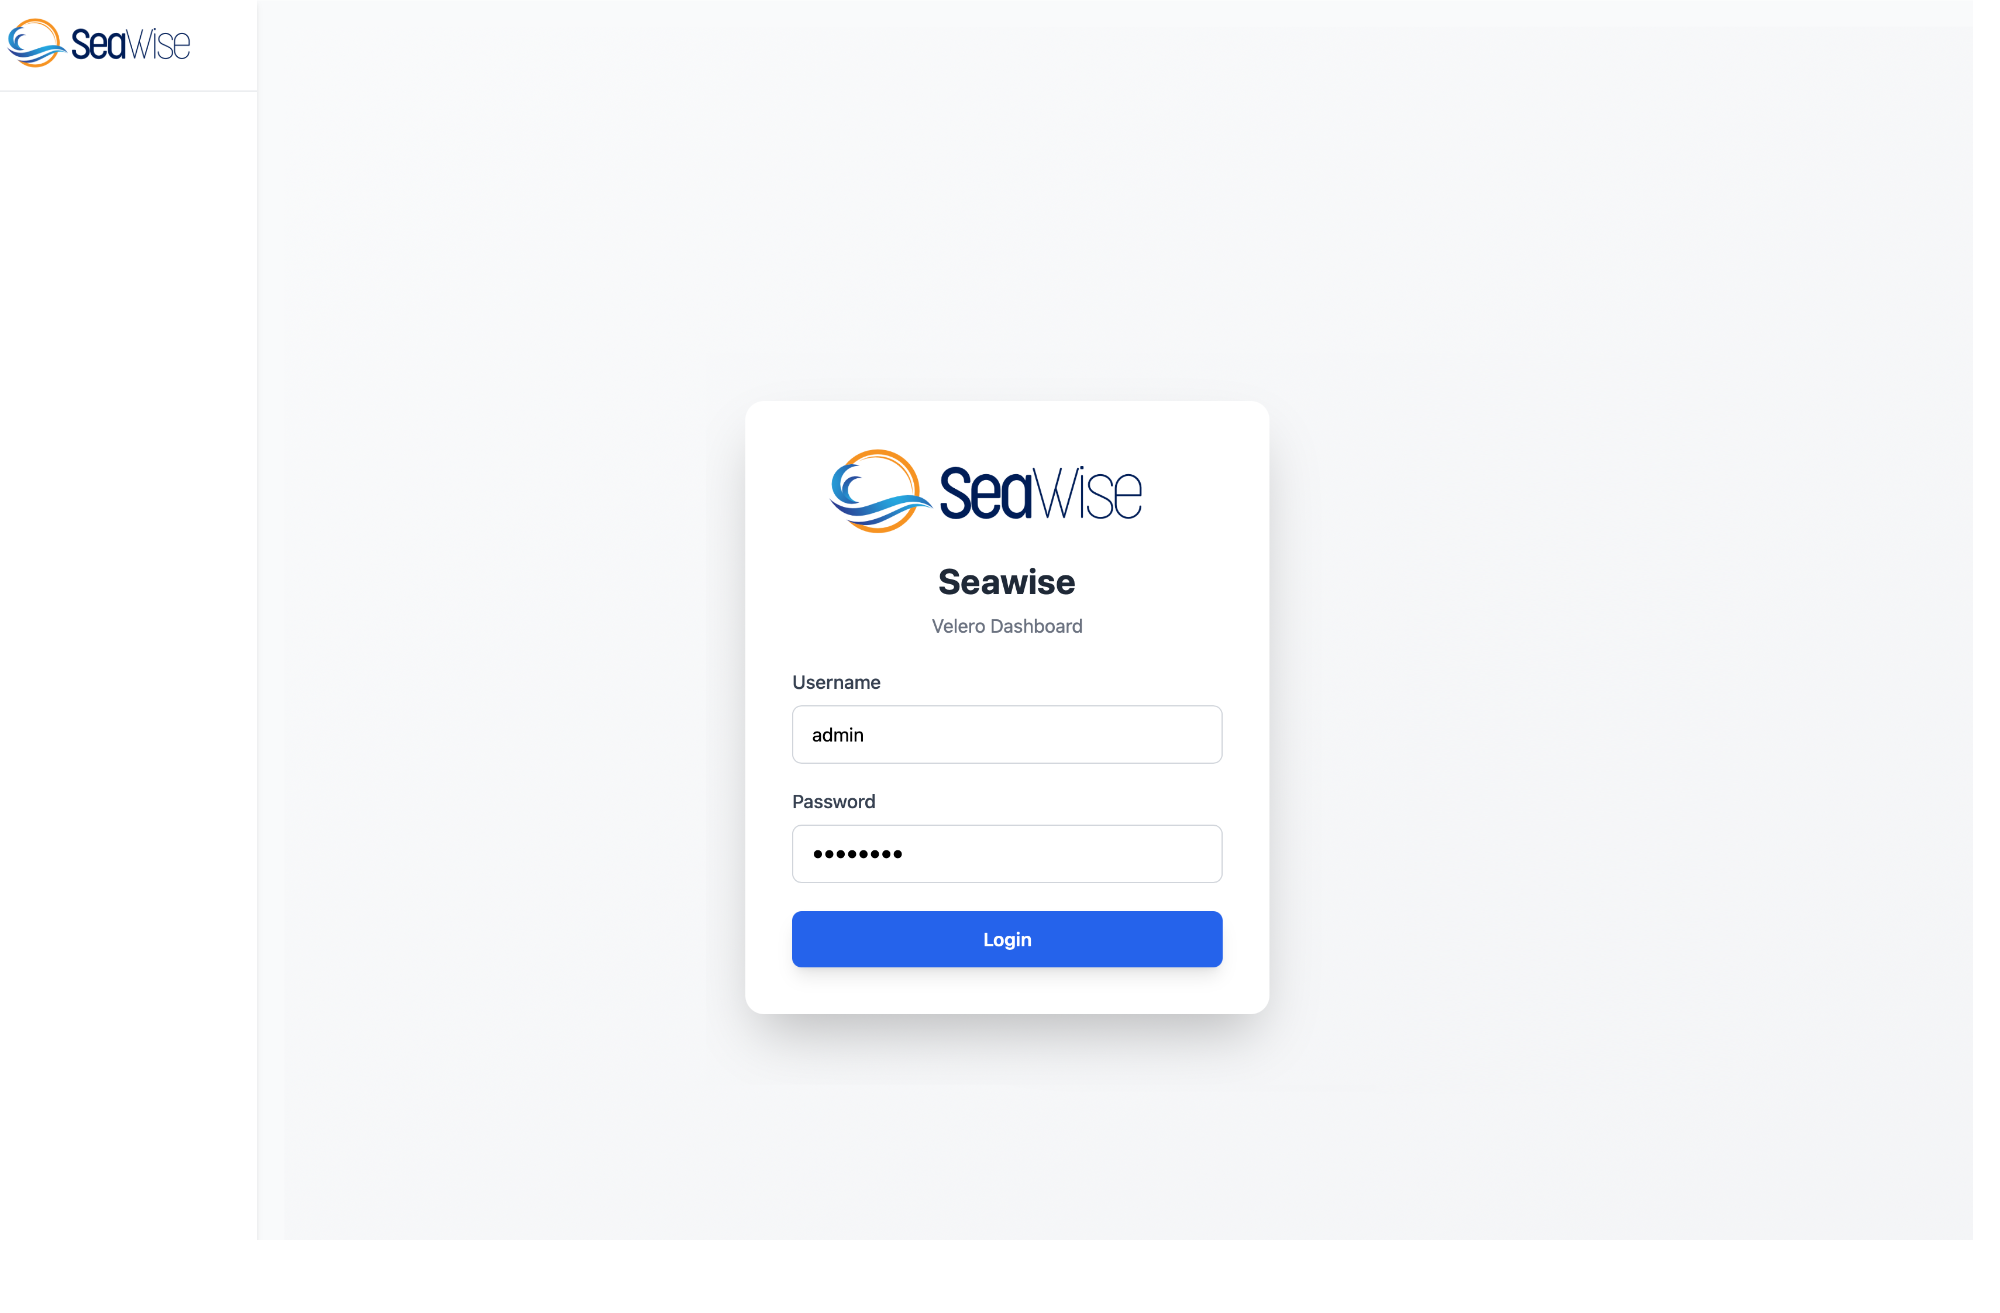
Seawise implements a session-based authentication system with three distinct permission levels.
Getting the Access URL
After installing Seawise via Helm Chart, you need to get the dashboard access URL:
OpenShift (with Route)
oc get route -n seawise-app seawise-dashboardOr get the complete URL directly:
oc get route -n seawise-app seawise-dashboard -o jsonpath='{.spec.host}'
echo ""
Kubernetes/Rancher (with Ingress)
kubectl get ingress -n seawise-app seawise-dashboardOr get the Ingress host:
kubectl get ingress -n seawise-app seawise-dashboard -o jsonpath='{.spec.rules[0].host}'
echo ""
Access via Port-Forward (Test)
If you don't have Ingress or Route configured, you can test via port-forward:
kubectl port-forward -n seawise-app svc/seawise-dashboard 8080:80
# Access: http://localhost:8080
Default Credentials - WARNING
Initial login:
- Username: admin
- Password: admin123
⚠️ This password MUST be changed on first access for security reasons!
Permission Levels
| Role | Permissions |
|---|---|
| admin | Full access: manage users, DPA, storage locations, backups, restores, reports and settings |
| backup | Create and manage backups/restores, view reports, but cannot manage users or settings |
| viewer | View only: dashboard and reports (read-only) |
First Access
- Access the URL obtained in the previous steps (ex:
https://seawise-dashboard-seawise-app.apps.cluster.example.com) - On the login screen, use the default credentials:
- Username:
admin - Password:
admin123
- Username:
- IMPORTANT: Change the default password immediately:
- Access the "Settings" or "Edit Profile" menu
- Change the password to a strong and secure password
- After changing the password, create additional users through the "User Management" menu
Security Tip
We recommend:
- Change the default password immediately after first login
- Create individual users for each person who needs to access the system
- Use strong passwords with at least 8 characters, including letters, numbers and symbols
- Assign only the necessary permissions for each user (principle of least privilege)
Dashboard
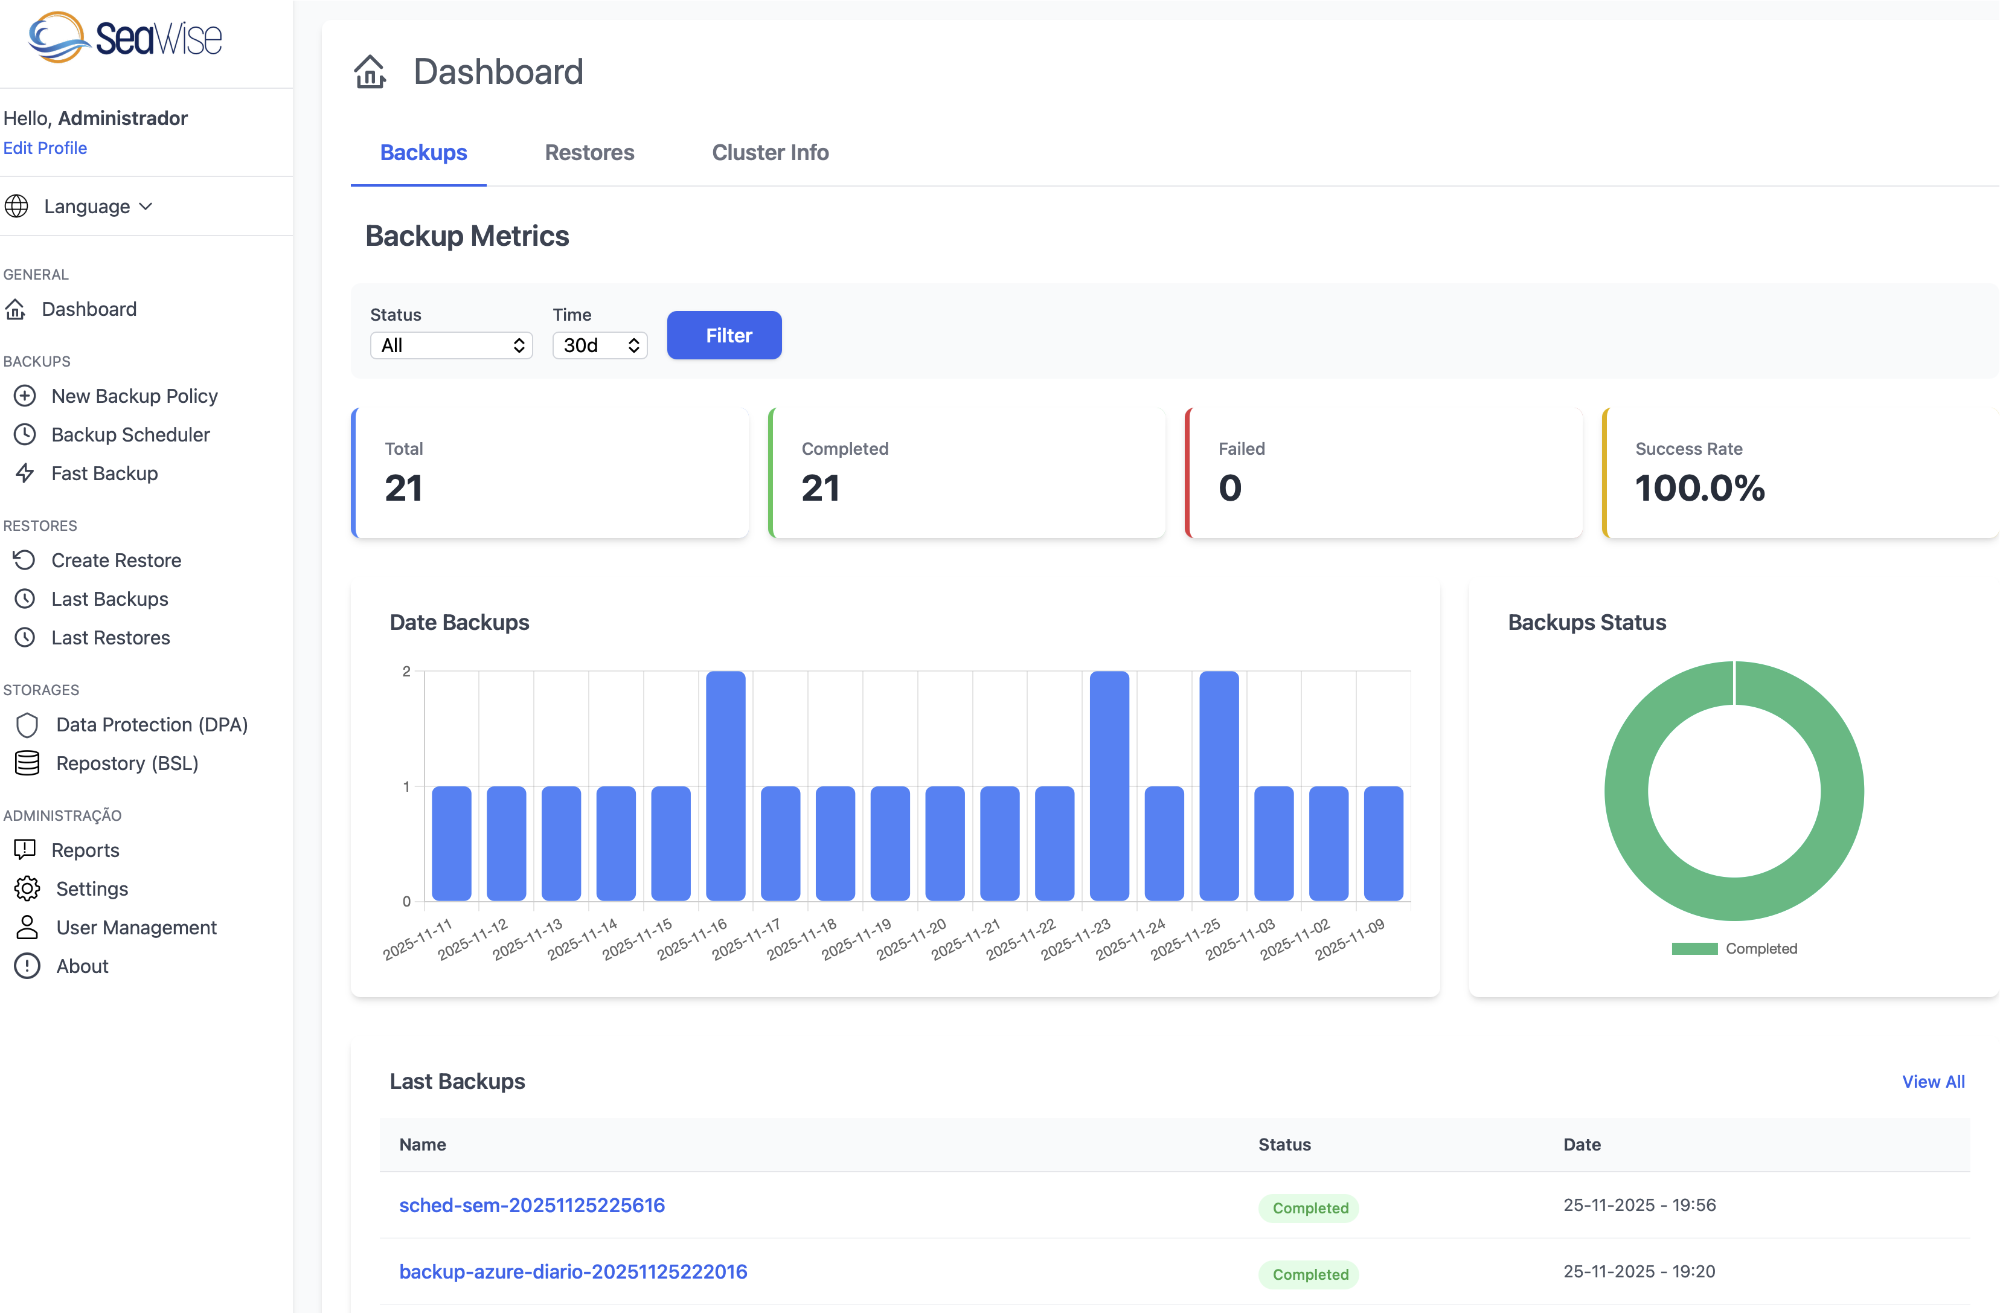
The Dashboard is the main screen of Seawise, offering a consolidated and analytical view of all backups, restores and cluster information through three main tabs.
Backups Tab
Backup Metrics
At the top of the dashboard, you find four cards with the main metrics:
- Total: Total number of backups performed
- Completed: Number of successfully completed backups
- Failed: Number of failed backups
- Success Rate: Success rate in percentage
Analytical Charts
- Date Backups: Bar chart showing the temporal distribution of backups
- Backups Status: Pie chart displaying the proportion between completed, in progress and failed backups
Filters and View
Above the charts you can filter data by:
- Status: All, Completed, Failed, InProgress
- Period: 30 days or 180 days
- Filter: Button to apply custom filters
Last Backups Table
Displays the most recent backups with the following columns:
- Name: Backup name (clickable for details)
- Status: Colored badge indicating status (Completed, Failed, etc.)
- Date: Backup creation date and time
Restores Tab
Restore Metrics
Cards with information about restore operations:
- Total: Total number of restores executed
- Completed: Number of successfully completed restores
- Failed: Number of failed restores
- Average Duration: Average duration of restores (in minutes)
Restore Charts
- Date Restore: Bar chart showing the temporal distribution of restores
- Restore Status: Pie chart with the proportion between completed, in progress and failed restores
Last Restores Table
Lists the most recent restores with name, status and date information.
Cluster Info Tab
Displays detailed information about the Kubernetes/OpenShift cluster:
- Platform: Platform type and version (ex: OpenShift 4.18.14)
- Cluster Name: Cluster name
- Kubernetes Version: Running Kubernetes version
- Master Nodes: Number of master nodes
- Worker Nodes: Number of worker nodes
- Total Nodes: Total nodes in cluster
- Namespaces: Total number of namespaces
- OADP Version: OADP/Velero version installed with status badge
Visual Resources
- Cards with Colored Borders: Each metric has a colored border for easy identification
- Interactive Charts: Graphical visualizations for quick trend analysis
- Status Badges: Colored indicators for states (Completed in green, Failed in red)
- Automatic Update: Dashboard automatically updates data periodically
Data Protection Application (DPA)
DPA (Data Protection Application) is the OADP (OpenShift API for Data Protection) custom resource that configures Velero in the OpenShift cluster. This functionality is exclusive to OpenShift and is the essential first step to configure backups in the cluster.
Important - OpenShift Only
DPA is used only on OpenShift clusters with OADP installed. For other Kubernetes clusters (Rancher, K3s, etc.), you don't need to configure DPA - just configure the Backup Storage Location (BSL) directly.
DPA Overview
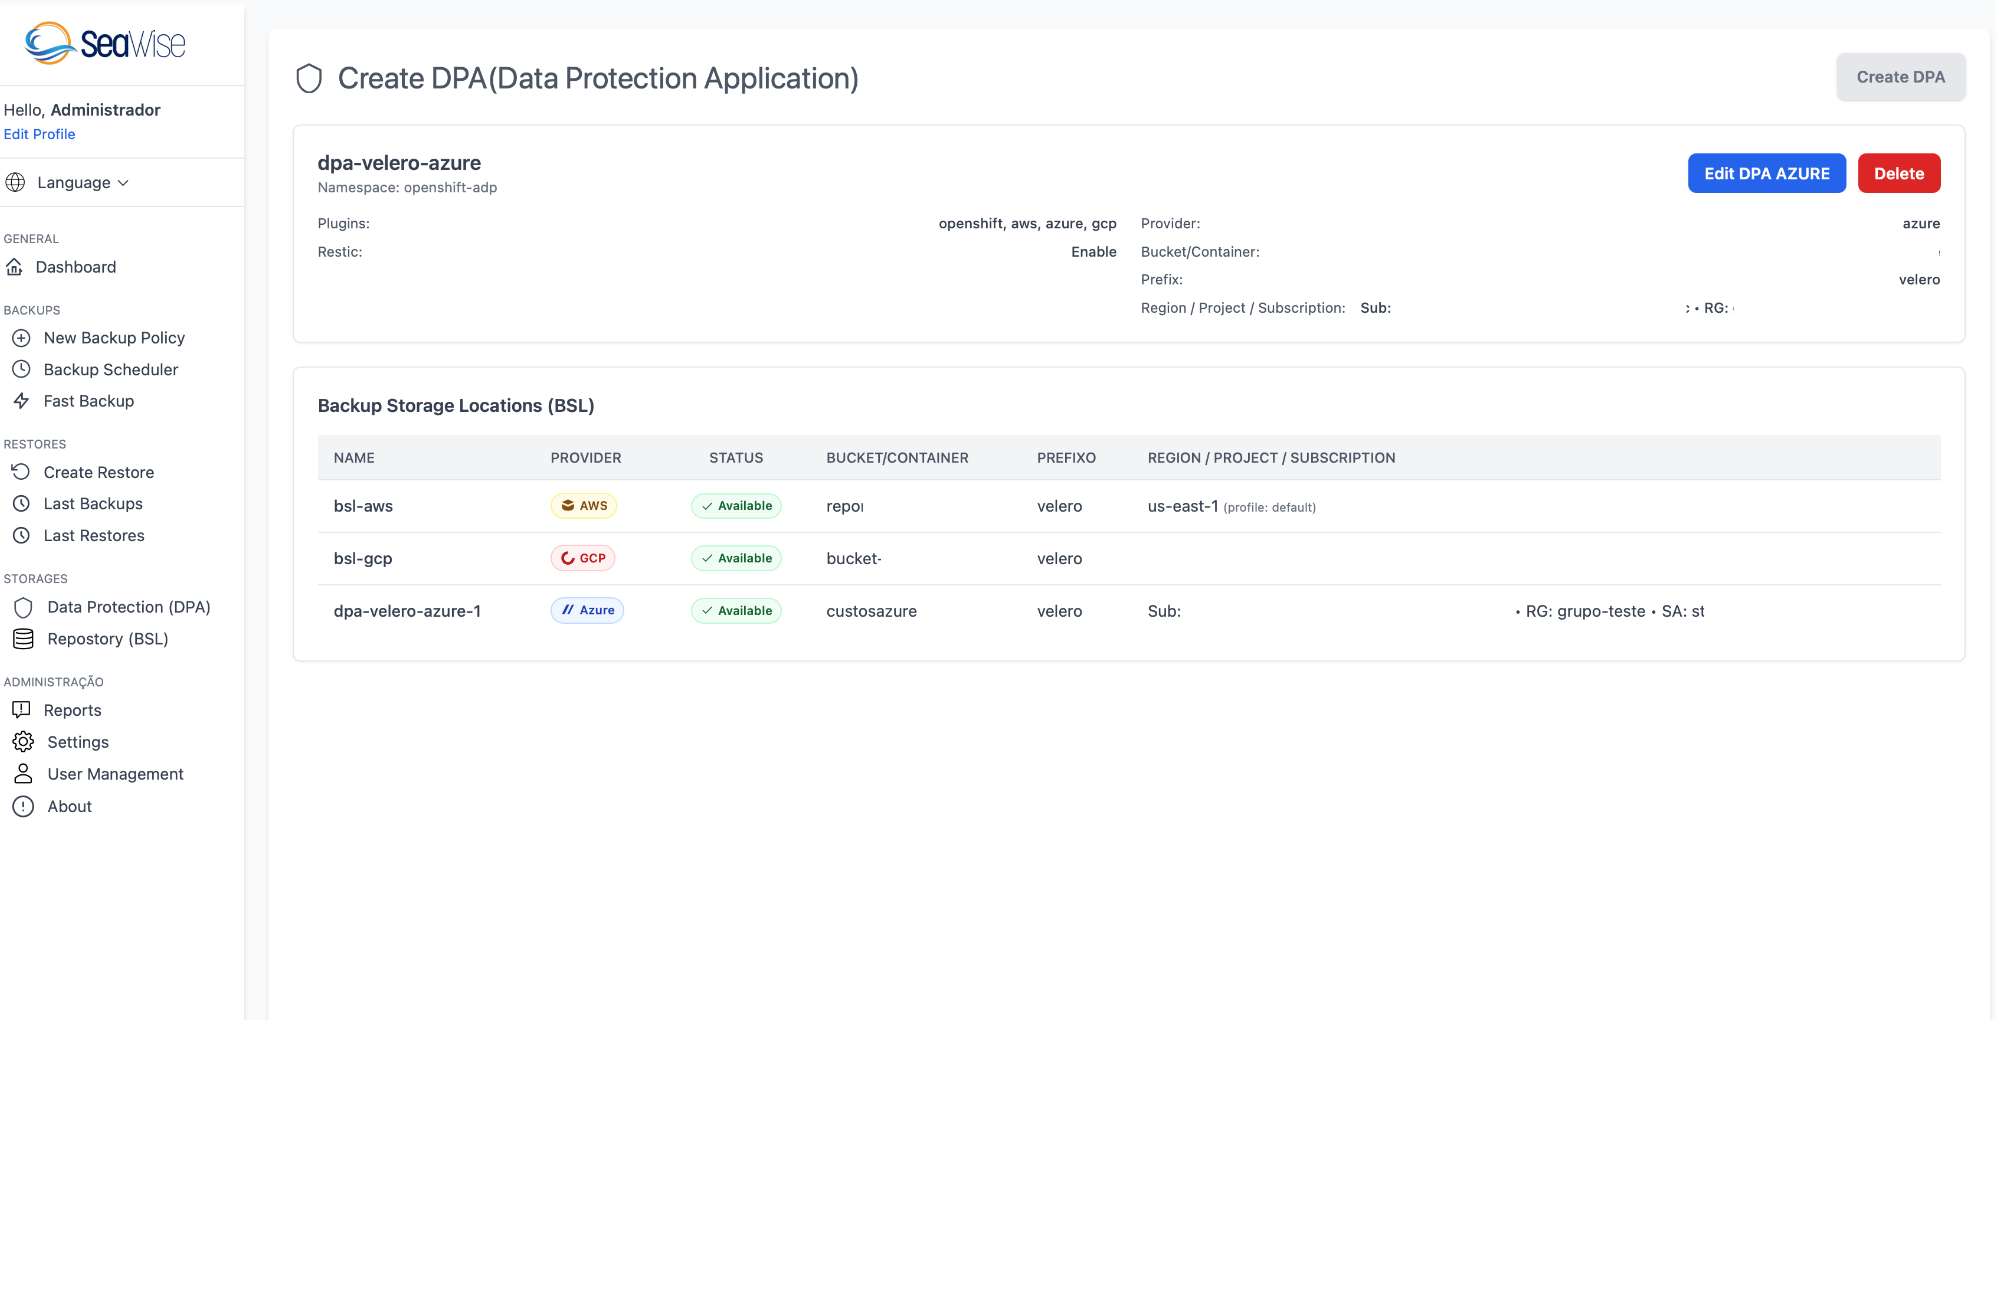
Seawise offers an intuitive interface to manage DPAs on OpenShift. Through the "Data Protection (DPA)" section in the menu, you can:
- View existing DPAs with their settings and status
- Create new DPAs for different cloud providers (AWS, Azure, GCP)
- Edit DPAs to update credentials or settings
- Delete DPAs when no longer needed
- View Backup Storage Locations (BSL) associated
DPA Management Page
The main page displays all DPAs configured in the cluster, showing:
- DPA Name: Unique DPA identifier (e.g., dpa-velero-azure)
- Namespace: Where the DPA is installed (usually openshift-adp)
- Plugins: Installed plugins (openshift, azure, aws, gcp, csi, restic)
- Restic: Restic status (Enable/Disable)
- Provider: Configured cloud provider (Azure, AWS, GCP)
- Bucket/Container: Storage bucket or container name
- Prefix: Backup file prefix
- Region/Project/Subscription: Cloud resource identification
- Actions: Buttons to edit (Edit DPA AZURE/AWS/GCP) or delete (Delete)
Backup Storage Locations (BSL)
Below the DPA list, you view all Backup Storage Locations automatically created by the DPA:
| Column | Description |
|---|---|
| NAME | BSL name (ex: bsl-aws, bsl-gcp, dpa-velero-azure-1) |
| PROVIDER | Colored badge indicating the provider (AWS orange, Azure blue, GCP multicolor) |
| STATUS | Connection status (Available in green) |
| BUCKET/CONTAINER | S3 bucket, Blob Container or GCS bucket name |
| PREFIX | File prefix (usually "velero" or "velero-ocp") |
| REGION/PROJECT/SUBSCRIPTION | Cloud location information |
Creating a New DPA
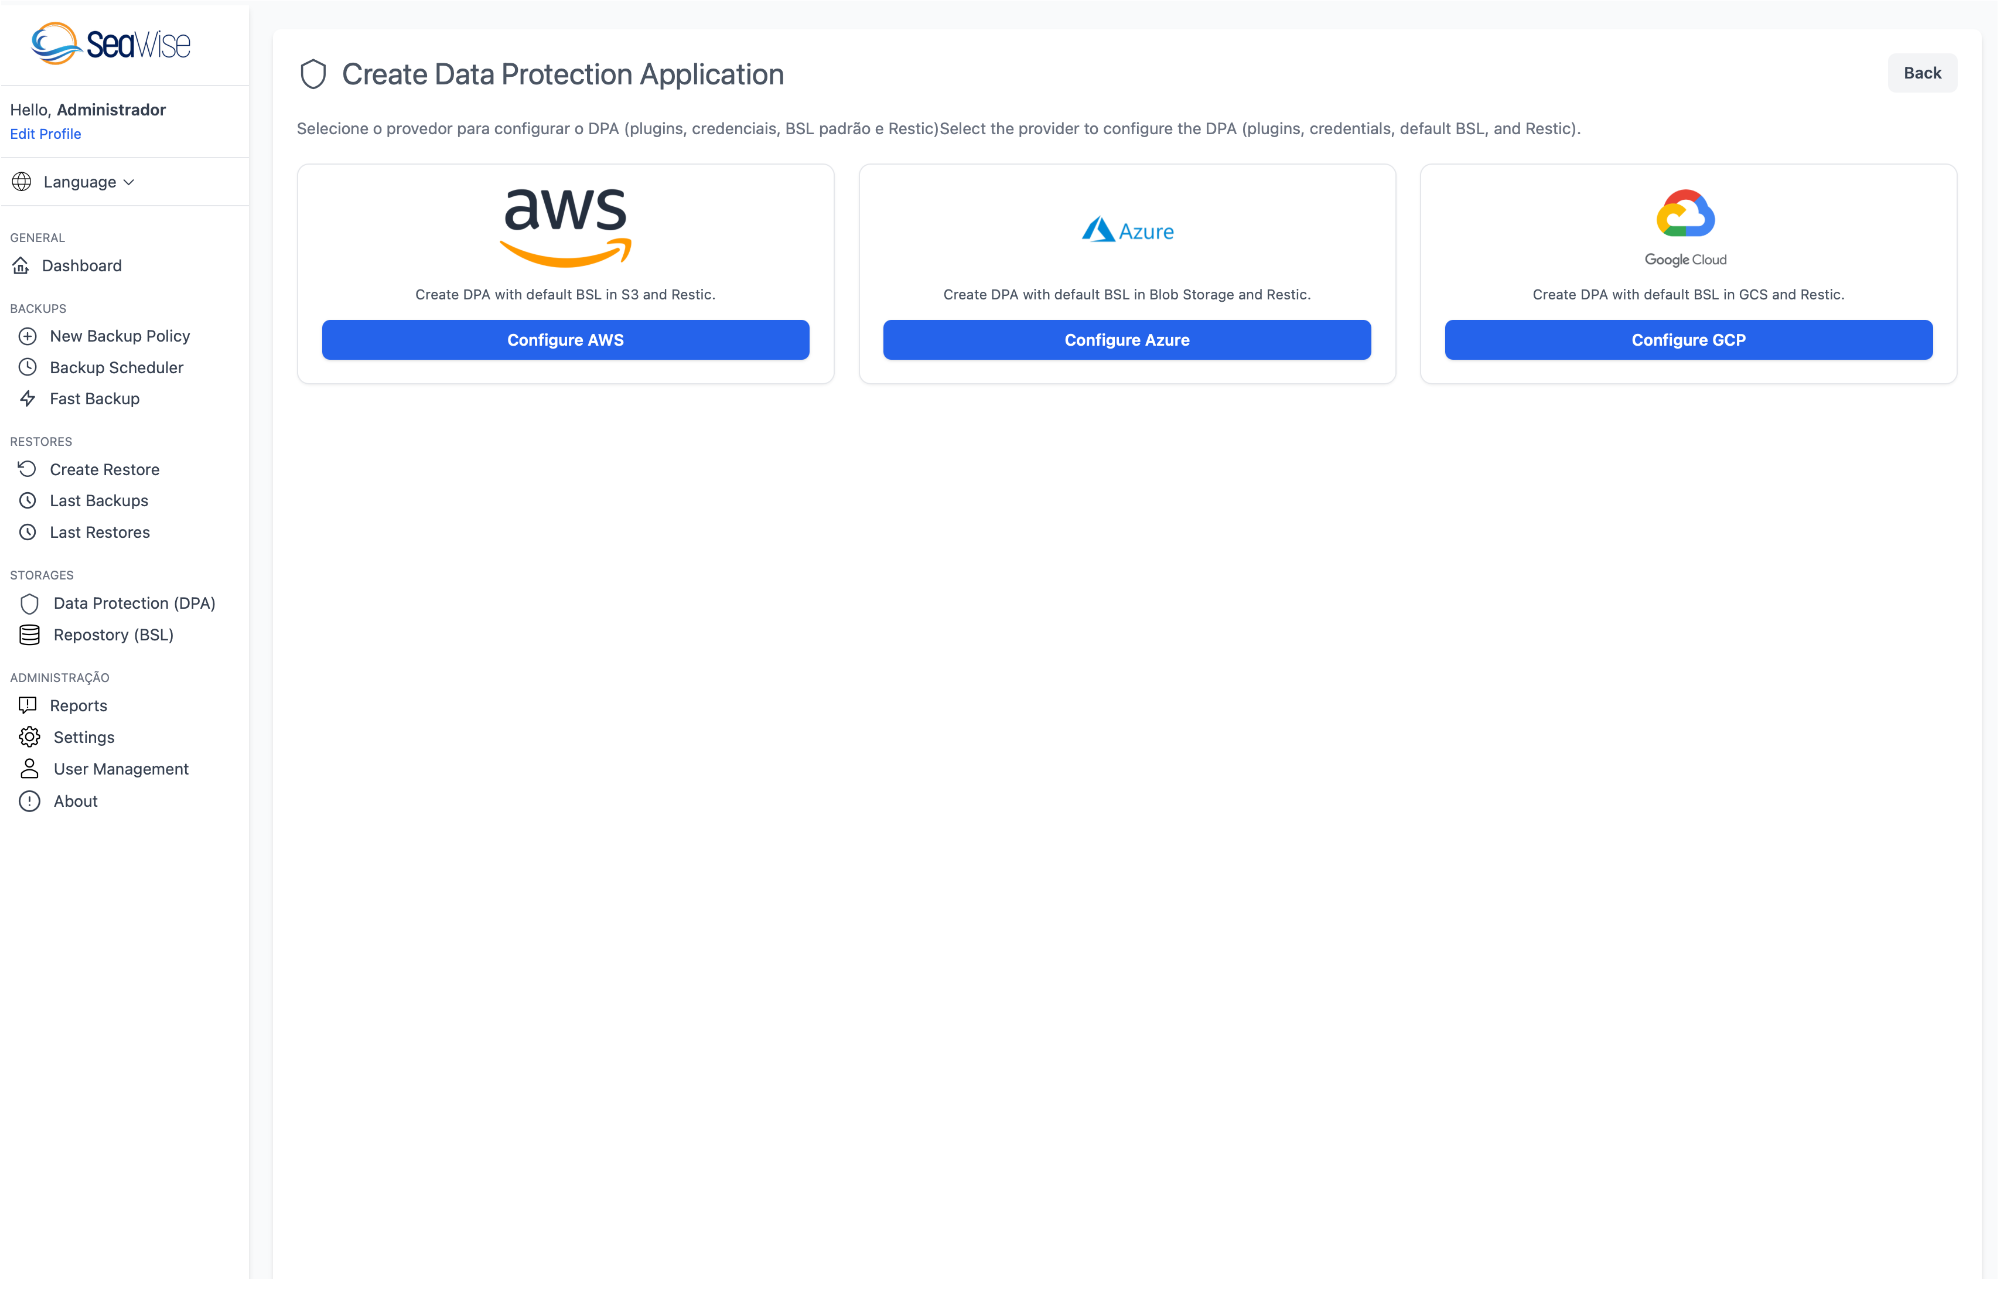
To create a DPA, click the "Create DPA" button in the upper right corner. You will be presented with the provider selection screen:
Provider Selection
Choose the cloud provider where your backups will be stored:
- AWS: Amazon Web Services - Creates DPA with openshift, aws, csi, Restic plugins and default BSL in S3
- Azure: Microsoft Azure - Creates DPA with openshift, azure, Restic plugins and default BSL in Blob Storage using Storage Account Access Key
- GCP: Google Cloud Platform - Creates DPA with openshift, gcp, csi, Restic plugins and default BSL in GCS
Click the button corresponding to your provider to continue:
- Configure AWS
- Configure Azure
- Configure GCP
DPA Configuration - AWS
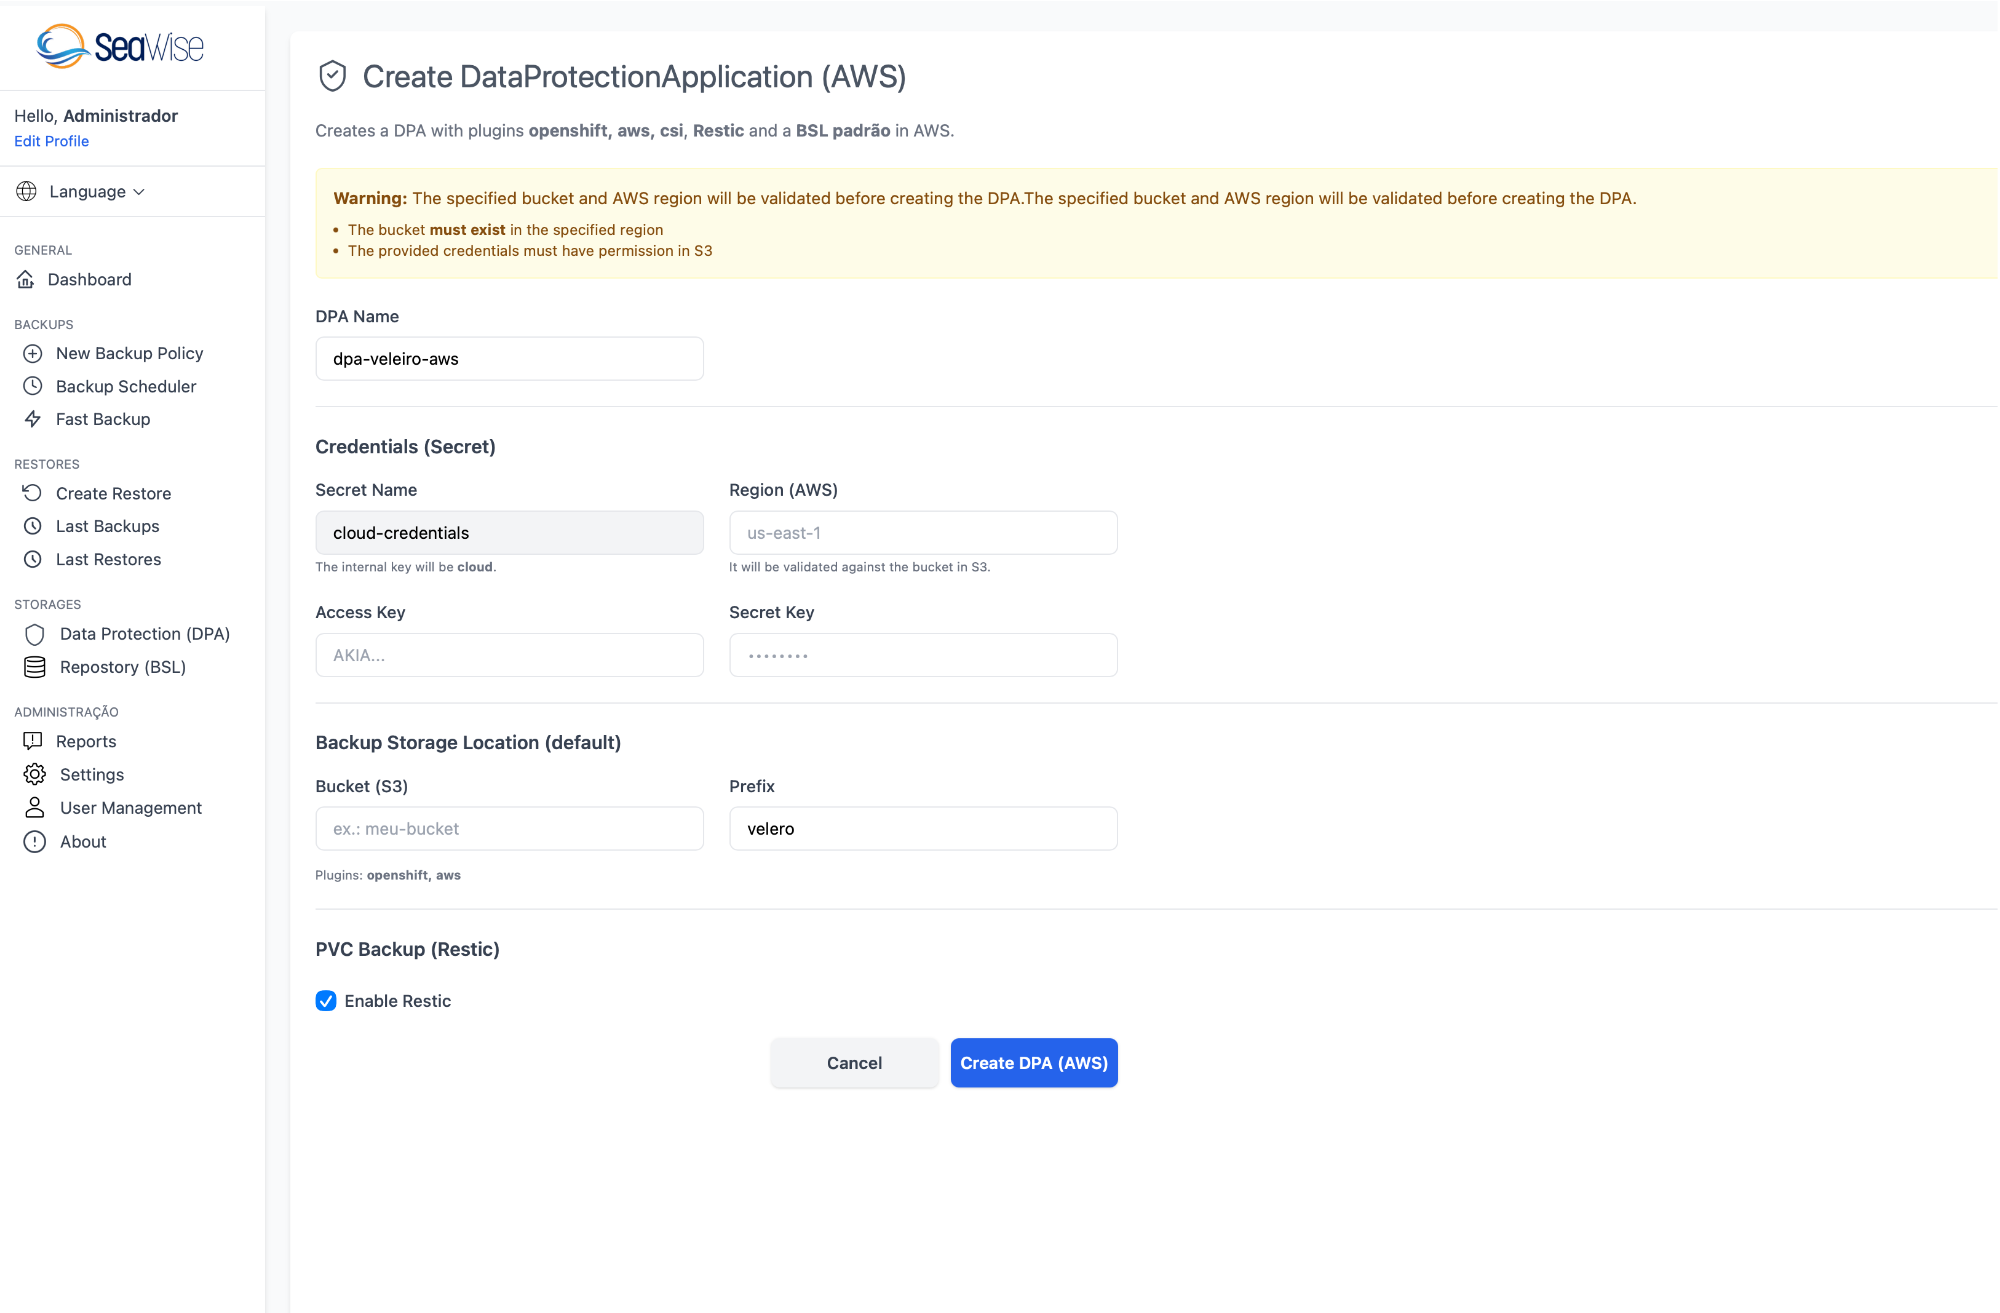
Creates a DPA with openshift, aws, csi, Restic plugins and a default BSL in AWS.
Warning - Automatic Validation
The specified bucket and AWS region will be validated before creating the DPA. Make sure that:
- The bucket exists in the specified region
- The provided credentials have S3 permission
AWS Form Fields
| Field | Description | Example | Required |
|---|---|---|---|
| DPA Name | Unique name for the DPA. Must follow Kubernetes standards (lowercase, hyphens) | dpa-velero-aws | Yes |
| Secret Name | Name of the Secret that will be created in the openshift-adp namespace. The internal key will be "cloud" | cloud-credentials | Yes |
| Region (AWS) | AWS region where the bucket is located. It will be validated against the bucket in S3 | us-east-1 | Yes |
| Access Key | AWS Access Key ID of the IAM account with read/write permissions in S3 | AKIA... | Yes |
| Secret Key | AWS Secret Access Key corresponding to the Access Key. It will be stored securely in the Secret | •••••••• | Yes |
| Bucket (S3) | Existing S3 bucket name where backups will be stored | my-bucket | Yes |
| Prefix | Prefix (folder) inside the bucket to organize backups | velero | Yes |
| Enable Restic | Checkbox to enable Restic (file-level volume backup) | ✓ Checked | No |
Plugins installed automatically: openshift, aws
Action Buttons
- Cancel: Cancels creation and returns to the DPA list
- Create DPA (AWS): Validates the fields and creates the DPA in the cluster
DPA Configuration - Azure
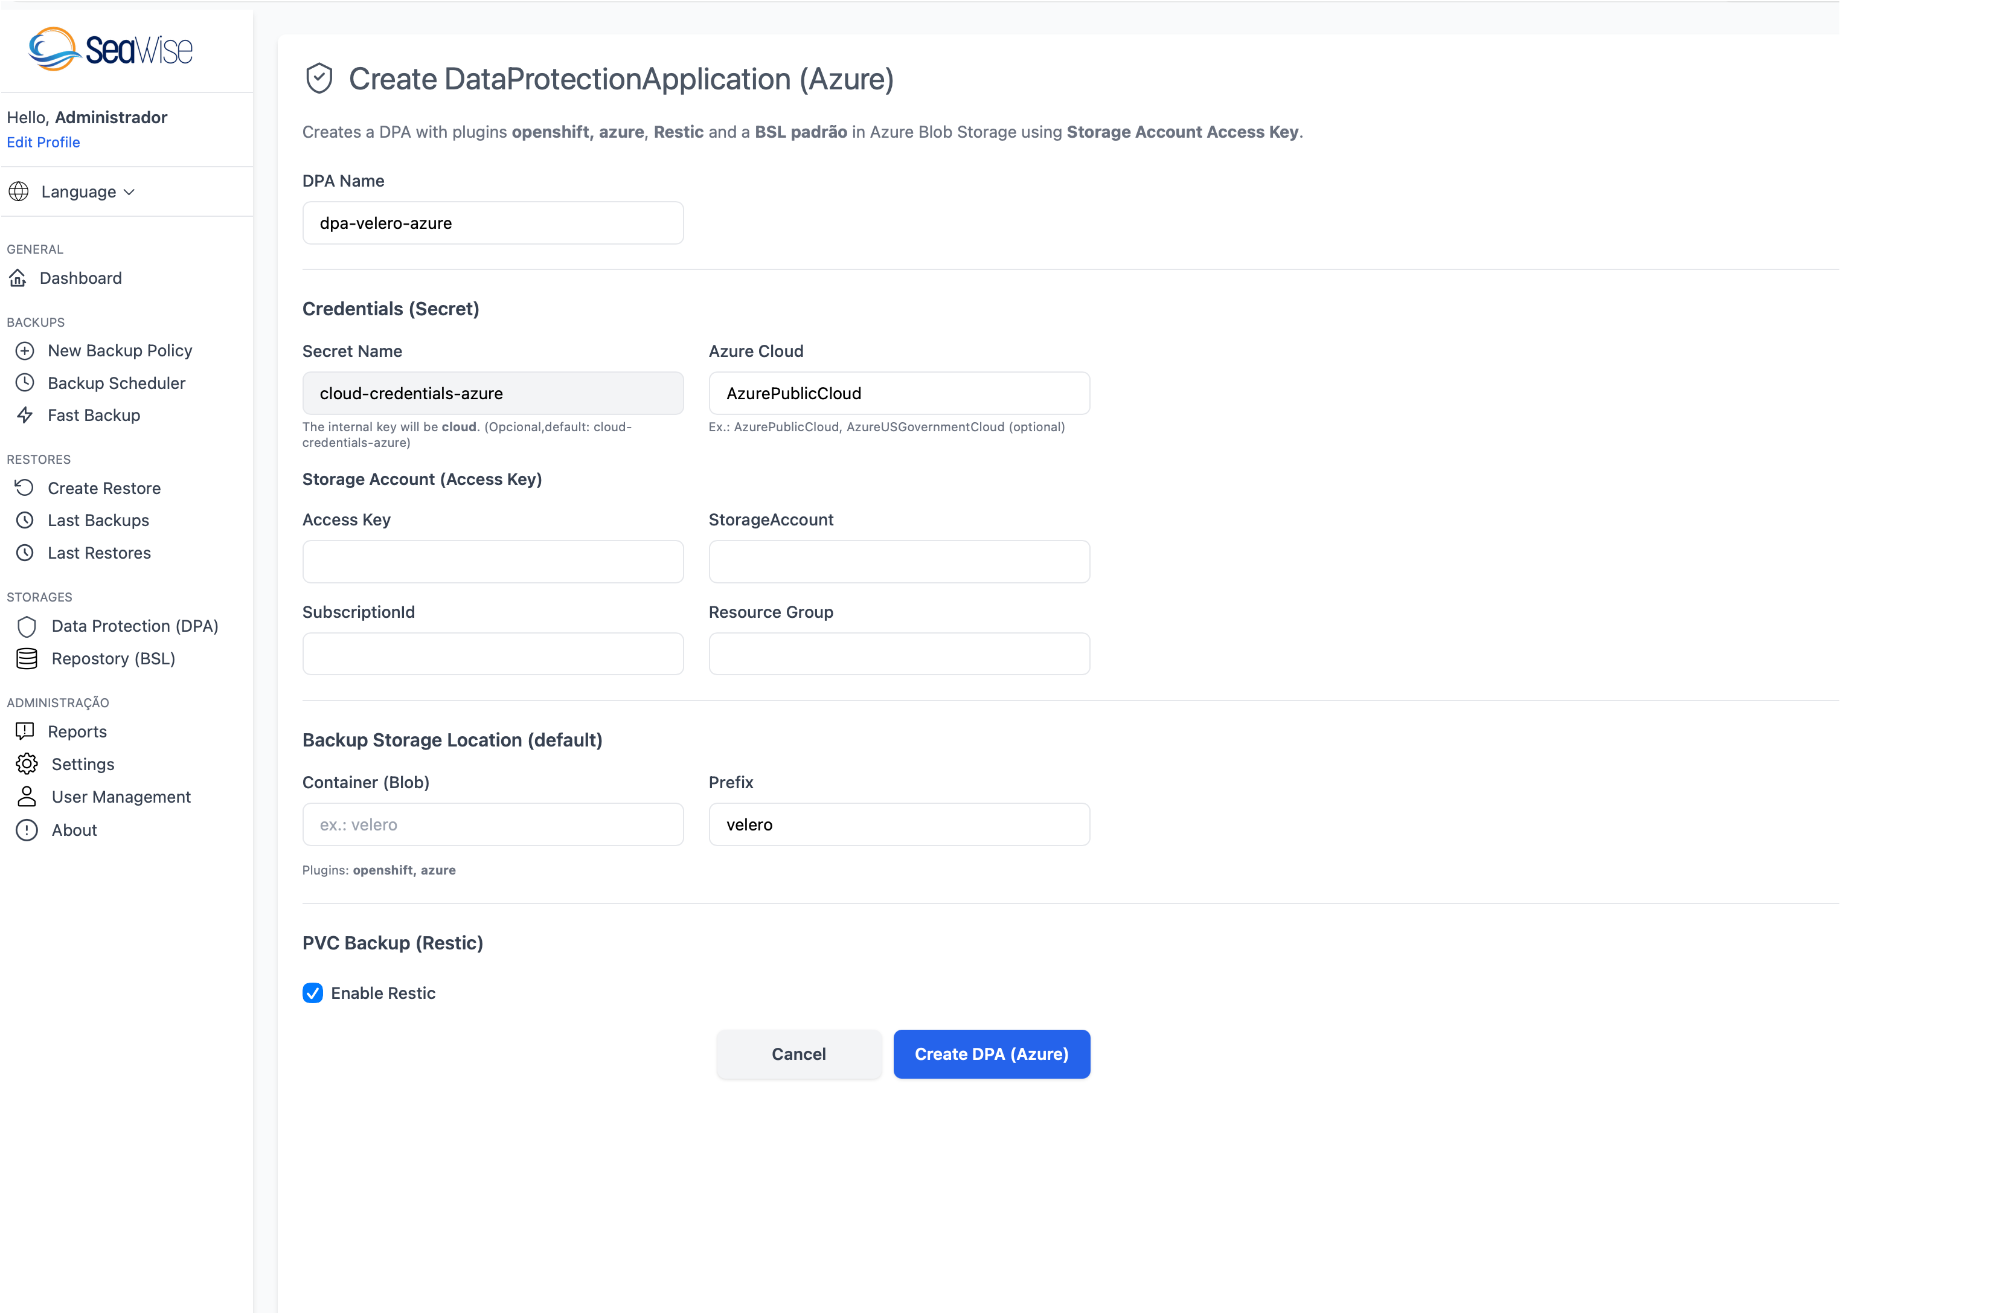
Creates a DPA with openshift, azure, Restic plugins and a default BSL in Azure Blob Storage using a Storage Account Access Key.
Azure Form Fields
| Field | Description | Example | Required |
|---|---|---|---|
| DPA Name | Unique name for the DPA | dpa-velero-azure | Yes |
| Secret Name | Name of the Secret that will be created. The internal key will be "cloud" | cloud-credentials-azure | Yes |
| Azure Cloud | Type of Azure cloud (AzurePublicCloud, AzureUSGovernmentCloud, etc.) | AzurePublicCloud | Yes |
| Access Key | Storage Account Access Key with read/write permissions on the container | •••••••• | Yes |
| StorageAccount | Name of the Storage Account where the container is located | mystorageaccount | Yes |
| SubscriptionId | Azure subscription ID | 352d269c-e74d-4abb-8c5a-774ae5bf0fbc | Yes |
| Resource Group | Name of the Resource Group where the Storage Account is located | test-group | Yes |
| Container (Blob) | Container name in Blob Storage where backups will be stored | velero | Yes |
| Prefix | Prefix (virtual folder) inside the container | velero | Yes |
| Enable Restic | Checkbox to enable Restic | ✓ Checked | No |
Plugins installed automatically: openshift, azure
Information
The Secret Name will be used internally with the pattern "cloud-credentials-azure". If not specified, the default value is used: cloud-credentials-azure
Action Buttons
- Cancel: Cancels creation
- Create DPA (Azure): Creates the DPA in the cluster
DPA Configuration - GCP
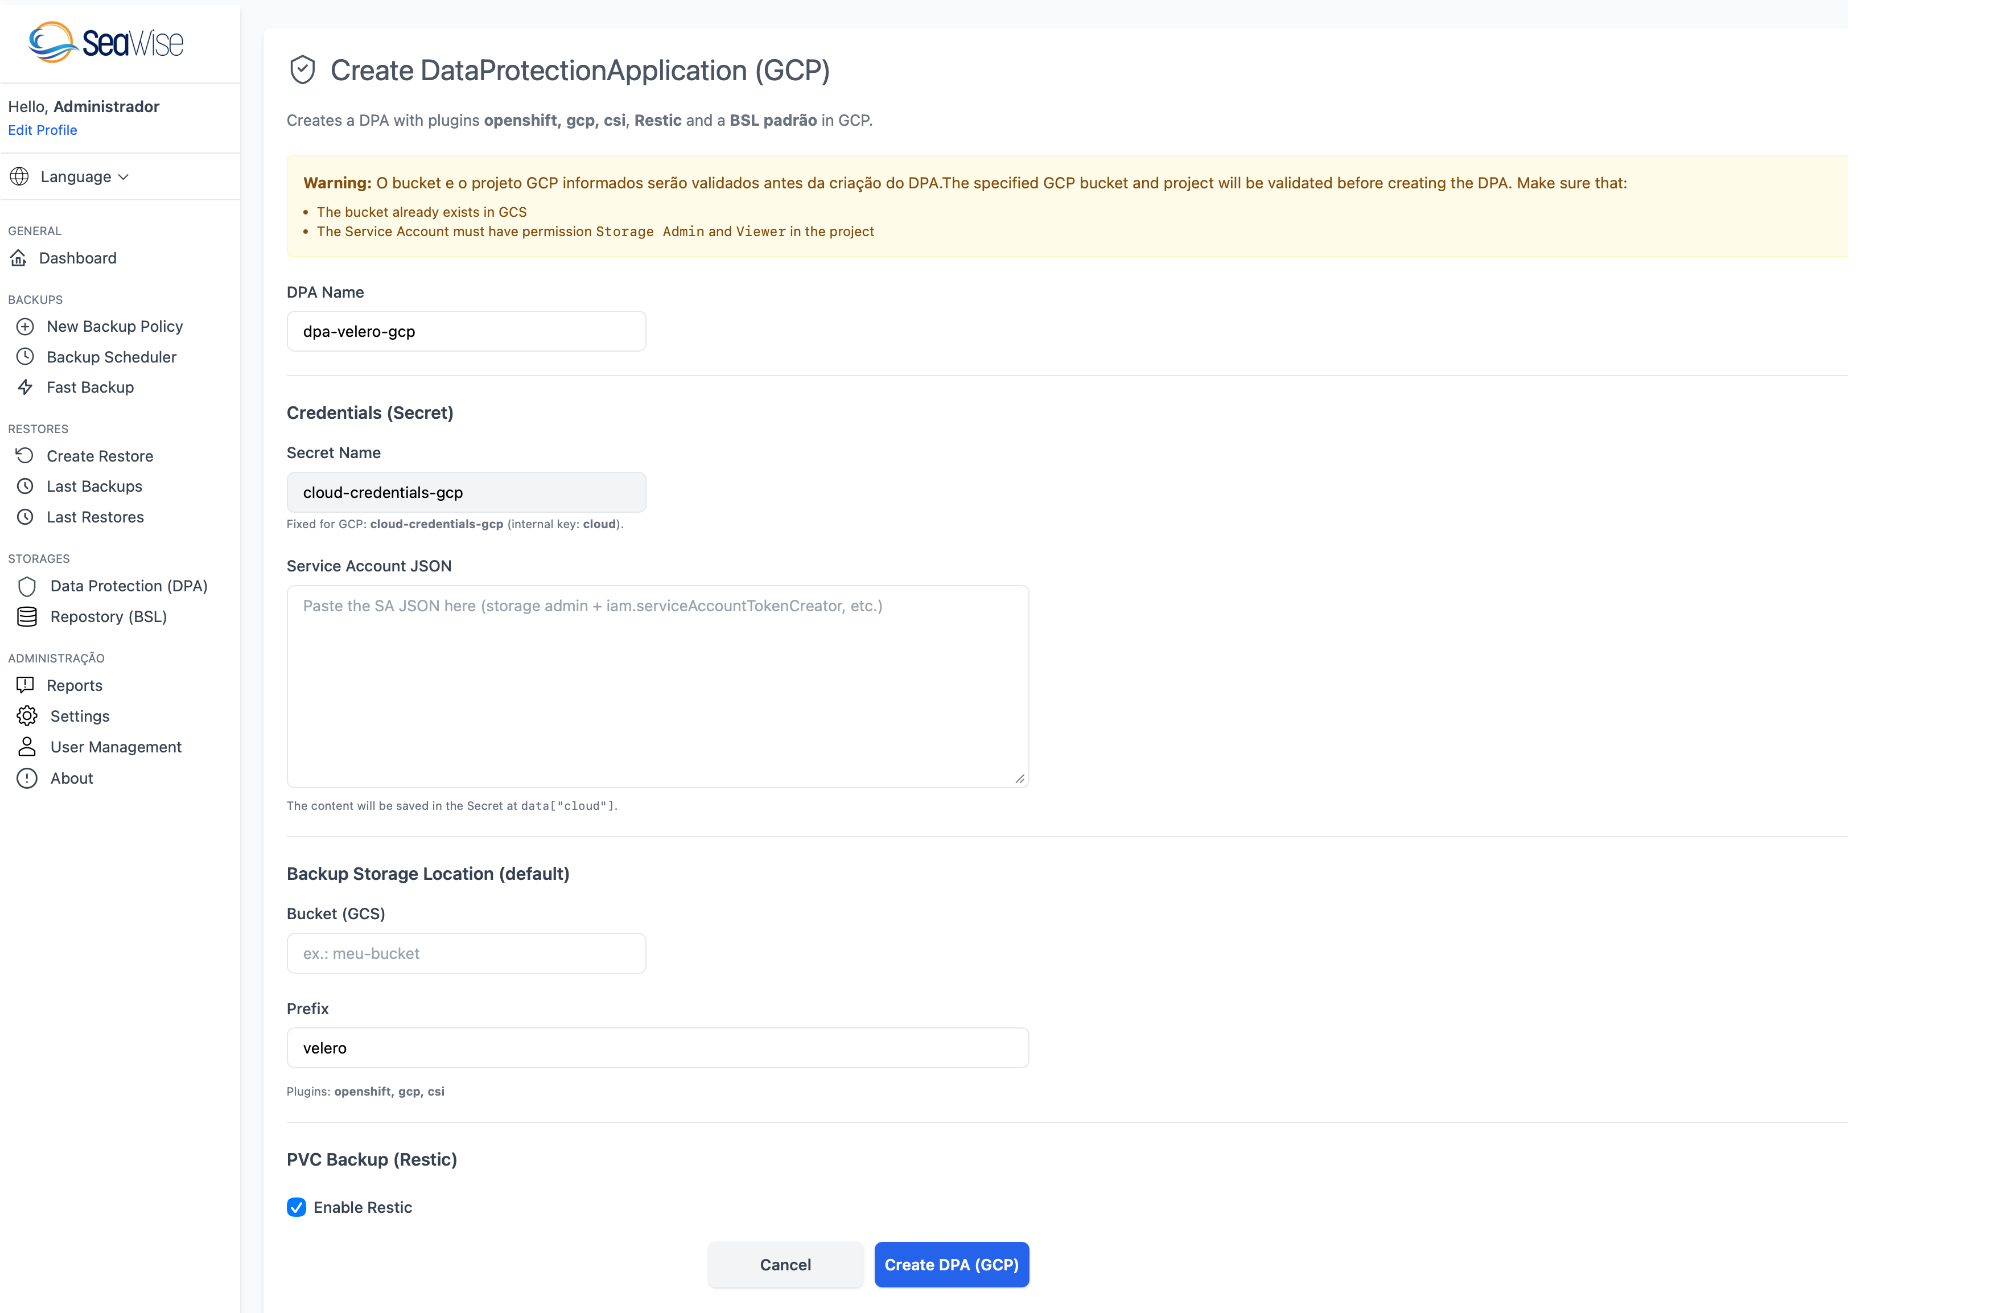
Creates a DPA with openshift, gcp, csi, Restic plugins and a default BSL in GCP.
Warning - GCP Validation
The provided GCP bucket and project will be validated before creating the DPA. Make sure that:
- The bucket already exists in GCS
- The Service Account has Storage Admin and iam.serviceAccountTokenCreator permissions in the project
GCP Form Fields
| Field | Description | Example | Required |
|---|---|---|---|
| DPA Name | Unique name for the DPA | dpa-velero-gcp | Yes |
| Secret Name | Name of the Secret. The internal key is fixed for GCP: "cloud-credentials-gcp" (internal key: cloud) | cloud-credentials-gcp | Yes |
| Service Account JSON | Paste the complete content of the GCP Service Account JSON file with storage admin + iam.serviceAccountTokenCreator permissions. The content will be saved in the Secret as data["cloud"] | Paste the SA JSON here... | Yes |
| Bucket (GCS) | Bucket name in Google Cloud Storage (must already exist) | my-bucket | Yes |
| Prefix | Prefix inside the bucket | velero | Yes |
| Enable Restic | Checkbox to enable Restic | ✓ Checked | No |
Plugins installed automatically: openshift, gcp, csi
Tip - Service Account JSON
To obtain the Service Account JSON in GCP:
- Access the GCP Console → IAM & Admin → Service Accounts
- Create or select a Service Account
- Go to "Keys" → "Add Key" → "Create new key" → Select "JSON"
- Download the JSON file and paste the full content into the field
Action Buttons
- Cancel: Cancels creation
- Create DPA (GCP): Validates and creates the DPA
Editing an Existing DPA
To edit a DPA, click the button corresponding to the provider in the list:
- Edit DPA AZURE: Opens the edit form for Azure DPA
- Edit DPA AWS: Opens the edit form for AWS DPA
- Edit DPA GCP: Opens the edit form for GCP DPA
In the edit form, you can update:
- Credentials (Access Keys, Secret Keys, Service Account JSON)
- Storage information (Bucket, Container, Prefix)
- Restic settings (Enable/Disable)
Caution When Editing
Changing credentials or storage settings can affect backups in progress. Make sure there are no backup/restore operations running before editing the DPA.
Deleting a DPA
To delete a DPA, click the red "Delete" button in the corresponding row. A confirmation will be requested before deletion.
Caution When Deleting
When deleting a DPA:
- All associated Backup Storage Locations will be removed
- Backups in remote storage (S3, Azure Blob, GCS) will NOT be deleted
- Configured schedules and backup policies will be lost
Validation and Troubleshooting
Status "Available" in the BSL
When the BSL shows status "Available" (green), it means that:
- Credentials are correct
- Velero can access remote storage
- The bucket/container exists and is accessible
- Permissions are configured correctly
Common Errors
| Error | Probable Cause | Solution |
|---|---|---|
| BSL Unavailable | Invalid credentials or bucket does not exist | Check credentials and confirm that the bucket exists in the specified region |
| DPA not reconciling | OADP namespace does not exist or OADP is not installed | Install the OADP Operator in the openshift-adp namespace |
| Validation failed (AWS/GCP) | Bucket does not exist in the specified region/project | Create the bucket beforehand or correct the region/project |
| Access Denied | Insufficient permissions in IAM/Service Account | Check the permissions required for each provider |
Permissions Required per Provider
AWS - IAM Permissions
{
  "Version": "2012-10-17",
  "Statement": [
    {
      "Effect": "Allow",
      "Action": [
        "s3:GetObject",
        "s3:PutObject",
        "s3:DeleteObject",
        "s3:ListBucket",
        "s3:GetBucketLocation"
      ],
      "Resource": [
        "arn:aws:s3:::YOUR-BUCKET-NAME/*",
        "arn:aws:s3:::YOUR-BUCKET-NAME"
      ]
    }
  ]
}
Azure - Role Assignments
The Storage Account Access Key must have the "Storage Blob Data Contributor" role on the Resource Group or the Storage Account.
GCP - Service Account Roles
gcloud projects add-iam-policy-binding PROJECT_ID \
  --member="serviceAccount:SERVICE_ACCOUNT_EMAIL" \
  --role="roles/storage.admin"

gcloud projects add-iam-policy-binding PROJECT_ID \
  --member="serviceAccount:SERVICE_ACCOUNT_EMAIL" \
  --role="roles/iam.serviceAccountTokenCreator"
Backup Repositories (BSL)
The BSL (Backup Storage Location) is the storage location where Velero/OADP saves backups. Seawise offers an intuitive interface to manage backup repositories across different cloud providers.
Important - Kubernetes and Rancher
If you are using Kubernetes or Rancher, you must first install Velero in your cluster with a default BSL. After installing Velero, you can use the Seawise interface to add additional BSLs.
For OpenShift, BSLs are created automatically when configuring the DPA (see the previous section).
Multiplatform Support
The BSL is supported on all platforms:
- OpenShift: BSLs are created automatically by the DPA, but you can add additional BSLs via Seawise
- Kubernetes/Rancher: First install Velero manually with an initial BSL, then add new BSLs via Seawise
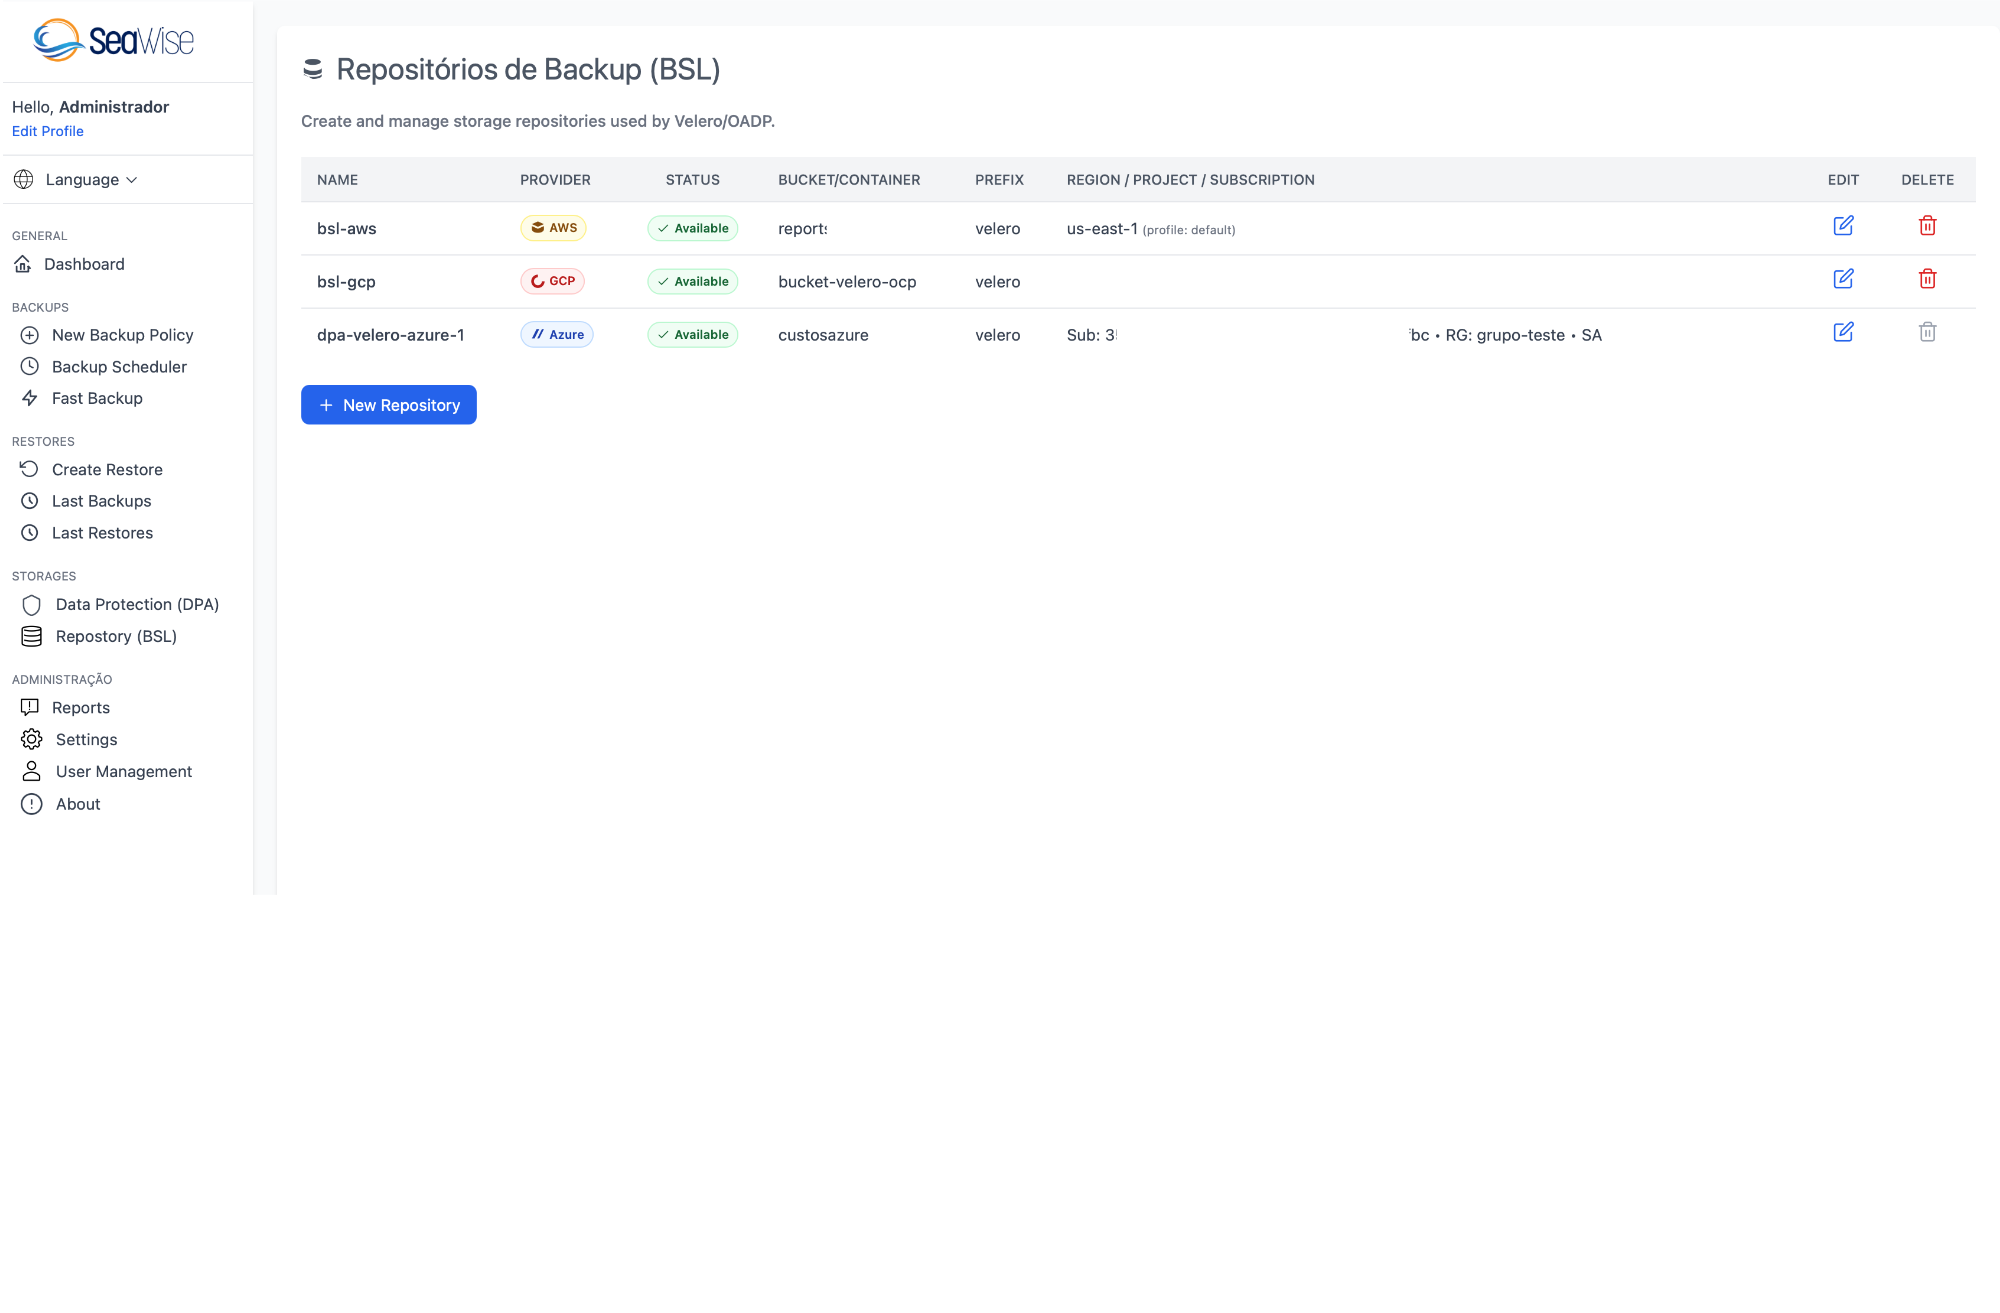
BSL Management Page
The "Backup Repositories (BSL)" page displays all Backup Storage Locations configured in the cluster:
| Column | Description |
|---|---|
| NAME | Unique name of the BSL (e.g., bsl-aws, bsl-gcp, dpa-velero-azure-1) |
| PROVIDER | Colored badge indicating the cloud provider (AWS orange, Azure blue, GCP multicolor) |
| STATUS | Connection status with storage (Available in green, Unavailable in red) |
| BUCKET/CONTAINER | Name of the S3 bucket, Blob Storage container, or GCS bucket where backups are stored |
| PREFIX | Prefix (folder) used to organize backups within the bucket/container |
| REGION/PROJECT/SUBSCRIPTION | Location information: AWS region, GCP project, or Azure subscription + Resource Group |
| EDIT | Button to edit BSL settings (blue pencil icon) |
| DELETE | Button to delete the BSL (red trash bin icon) |
Prerequisites for Kubernetes/Rancher
Important - Prior Velero Installation
For Kubernetes or Rancher clusters, you must install Velero manually BEFORE using Seawise to add additional BSLs.
Example of Velero Installation on Kubernetes/Rancher
AWS S3:
velero install \
  --provider aws \
  --plugins velero/velero-plugin-for-aws:v1.9.0 \
  --bucket YOUR-BUCKET-NAME \
  --backup-location-config region=us-east-1 \
  --secret-file ./credentials-velero \
  --use-volume-snapshots=true \
  --snapshot-location-config region=us-east-1
Azure Blob Storage:
velero install \
  --provider azure \
  --plugins velero/velero-plugin-for-microsoft-azure:v1.9.0 \
  --bucket YOUR-CONTAINER-NAME \
  --secret-file ./credentials-velero \
  --backup-location-config resourceGroup=YOUR-RESOURCE-GROUP,storageAccount=YOUR-STORAGE-ACCOUNT \
  --snapshot-location-config apiTimeout=5m,resourceGroup=YOUR-RESOURCE-GROUP
GCP Cloud Storage:
velero install \
  --provider gcp \
  --plugins velero/velero-plugin-for-gcp:v1.9.0 \
  --bucket YOUR-BUCKET-NAME \
  --secret-file ./credentials-velero
Tip
After installing Velero with an initial BSL, Seawise will detect it automatically and you can manage it through the web interface, as well as add new BSLs for other providers or regions.
Creating a New BSL
To add a new Backup Storage Location, click the "+ New Repository" button. You will be taken to the creation form:
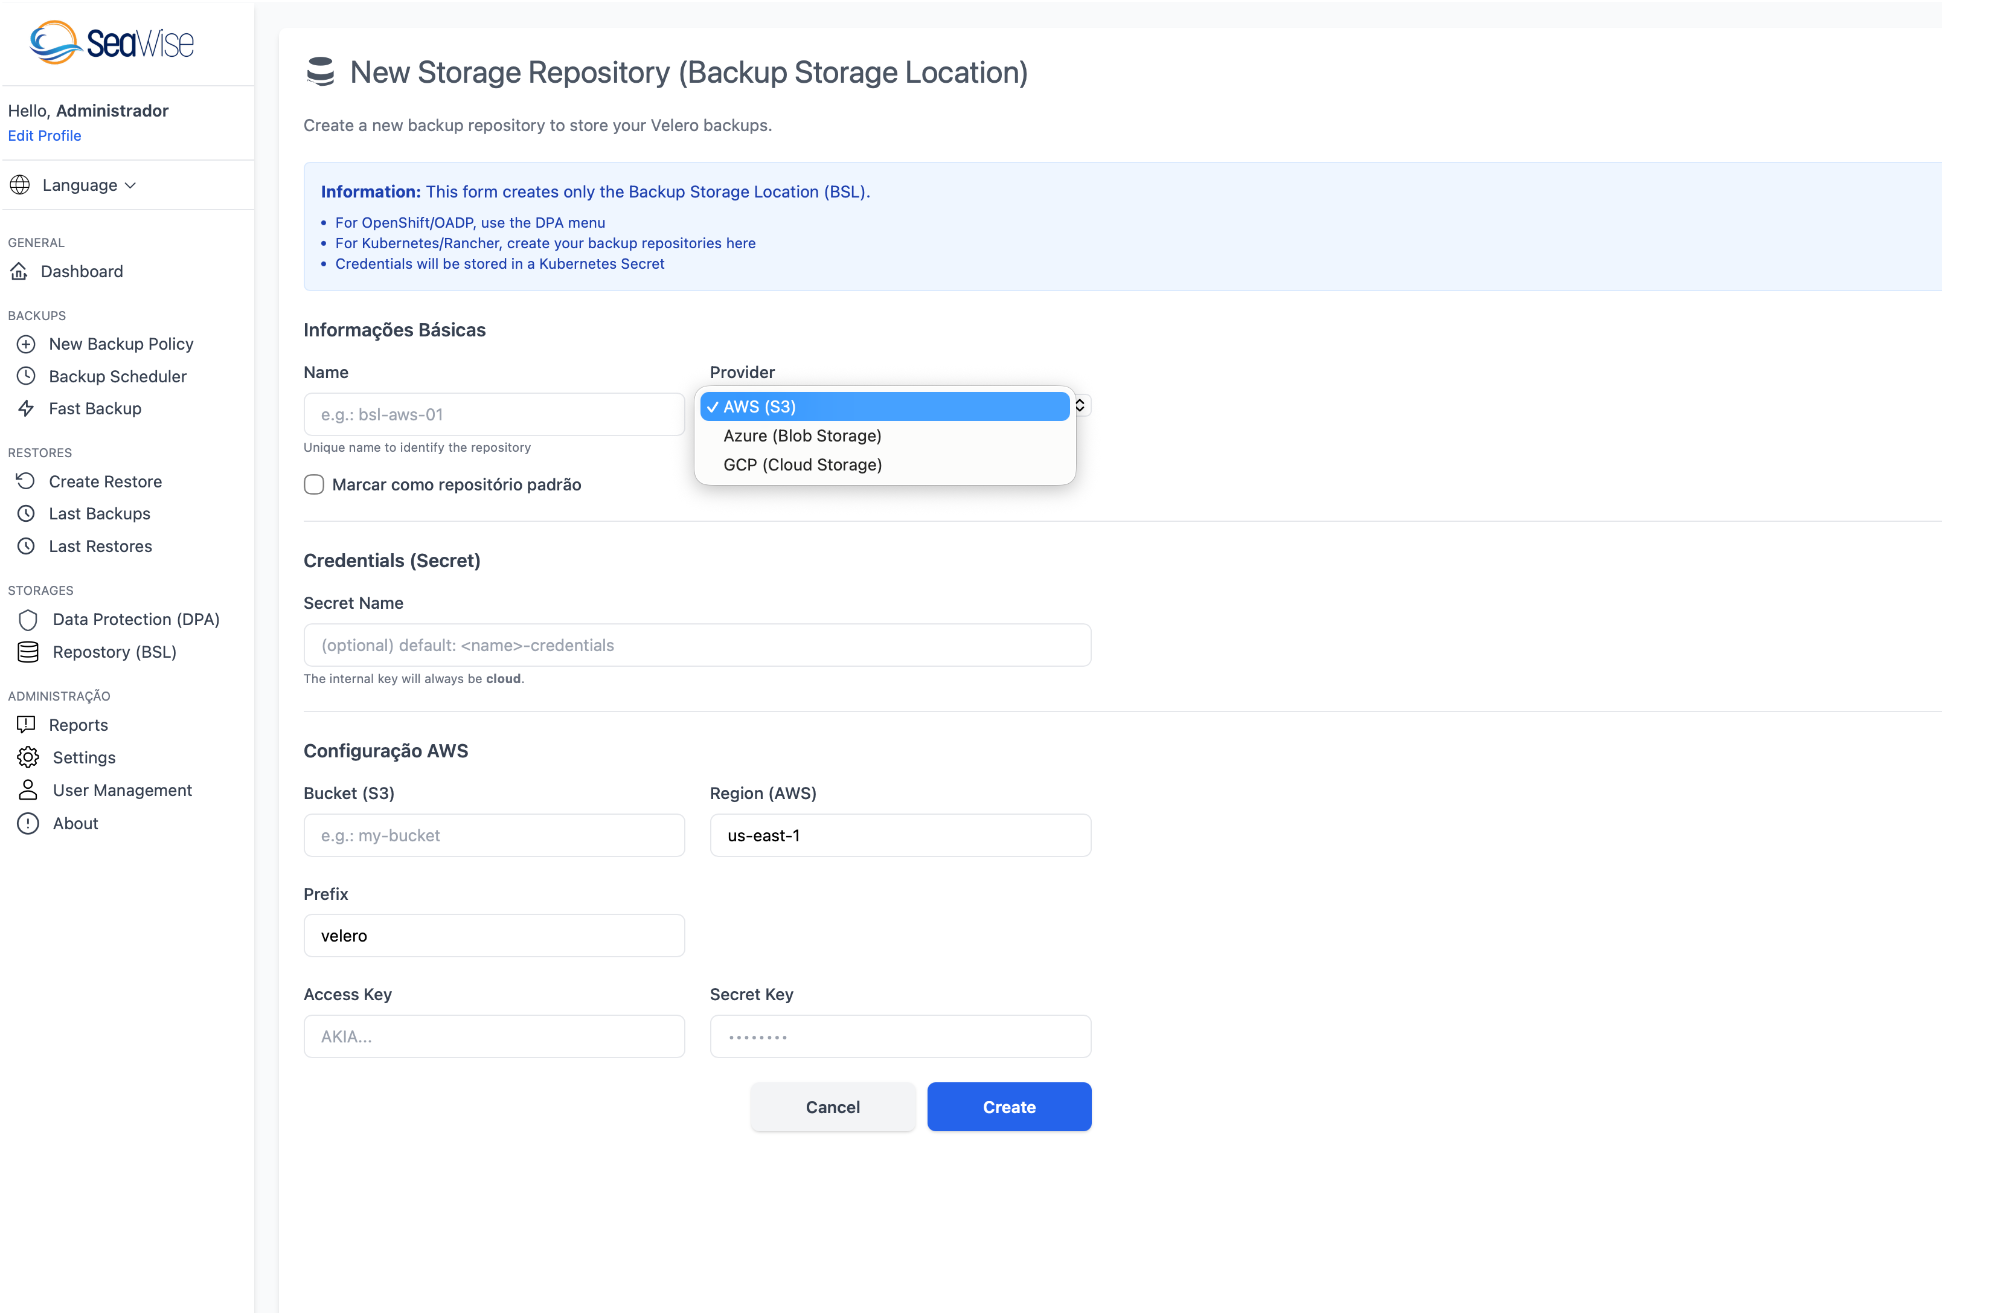
Important Information
This form creates only the Backup Storage Location (BSL):
- For OpenShift/OADP: Use the DPA menu to create the BSL automatically along with the DPA
- For Kubernetes/Rancher: Create your backup repositories here
- Credentials: Will be stored in a Kubernetes Secret
Basic Information
| Field | Description | Example | Required |
|---|---|---|---|
| Name | Unique name to identify the repository. Must follow Kubernetes standards (lowercase, hyphens) | bsl-aws-01 | Yes |
| Provider | Cloud provider where storage is located | AWS (S3), Azure (Blob Storage), GCP (Cloud Storage) | Yes |
| Mark as default repository | Checkbox to set this BSL as default. Backups without a specified BSL will use this one | ☐ Unchecked (optional) | No |
Credentials (Secret)
| Field | Description | Required |
|---|---|---|
| Secret Name | Name of the Kubernetes Secret where credentials will be stored. If not specified, the default is used: <name>-credentials. The internal key will always be "cloud" | No |
AWS Configuration (S3)
When you select AWS (S3) as provider:
| Field | Description | Example | Required |
|---|---|---|---|
| Bucket (S3) | S3 bucket name where backups will be stored | my-bucket | Yes |
| Region (AWS) | AWS region of the bucket | us-east-1 | Yes |
| Prefix | Prefix (folder) inside the bucket to organize backups | velero | Yes |
| Access Key | AWS Access Key ID with S3 permissions | AKIA... | Yes |
| Secret Key | AWS Secret Access Key corresponding to the Access Key | •••••••• | Yes |
Azure Configuration (Blob Storage)
When you select Azure (Blob Storage) as provider:
| Field | Description | Example | Required |
|---|---|---|---|
| Container (Blob) | Container name in Azure Blob Storage | velero | Yes |
| Storage Account | Name of the Azure Storage Account | mystorageaccount | Yes |
| Resource Group | Resource Group of the Storage Account | test-group | Yes |
| Subscription ID | Azure subscription ID | 352d269c-e74d-4abb-8c5a-774ae5bf0fbc | Yes |
| Prefix | Prefix within the container | velero | Yes |
| Access Key | Storage Account Access Key | •••••••• | Yes |
GCP Configuration (Cloud Storage)
When you select GCP (Cloud Storage) as provider:
| Field | Description | Example | Required |
|---|---|---|---|
| Bucket (GCS) | Bucket name in Google Cloud Storage | my-bucket | Yes |
| Prefix | Prefix within the bucket | velero | Yes |
| Service Account JSON | Complete content of the GCP Service Account JSON file | { "type": "service_account", ... } | Yes |
Editing a BSL
To edit an existing BSL, click on the blue pencil icon in the EDIT column. You can update:
- Access credentials (Access Keys, Secret Keys, Service Account JSON)
- Storage settings (Bucket, Container, Prefix)
- Region/project/subscription information
- Default repository status
Caution When Editing
Changing credentials or settings of a BSL can affect backups in progress. Make sure there are no active backup/restore operations before editing.
Deleting a BSL
To delete a BSL, click on the red trash bin icon in the DELETE column. A confirmation will be requested.
Caution When Deleting
When deleting a BSL:
- Velero will no longer be able to access backups stored in this BSL
- Backups that specify this BSL cannot be created
- Backups in remote storage (S3, Azure Blob, GCS) will NOT be deleted
- You cannot delete the default BSL if it's the only BSL configured
Status Verification
Status "Available" (Green)
Indicates that:
- Credentials are correct and valid
- Velero can access remote storage
- The bucket/container exists and is accessible
- Permissions are configured correctly
- The BSL is ready to be used in backups
Status "Unavailable" (Red)
Indicates connectivity or configuration issues:
- Invalid or expired credentials
- Bucket/container does not exist
- Insufficient permissions
- Incorrect region/project
- Network issues between the cluster and storage
Best Practices
- Use distinct prefixes: If using the same bucket for multiple BSLs, use different prefixes (e.g., "prod/", "dev/")
- BSLs per region: Configure BSLs in different regions for geographic redundancy
- Default repository: Define only one BSL as default to avoid confusion
- Test regularly: Check BSL status periodically to ensure connectivity
- Rotate credentials: Update credentials periodically for security
- Multiple providers: Configure BSLs in different clouds (AWS + Azure) for multi-cloud redundancy
Fast Backup
Fast Backup allows you to create backups quickly through a simplified interface, ideal for one-time and urgent backups.
How to Create a Fast Backup
- Access the "Fast Backup" menu
- Fill in the form with the necessary information
- Click on "Create Backup"
- Track the progress on the Dashboard
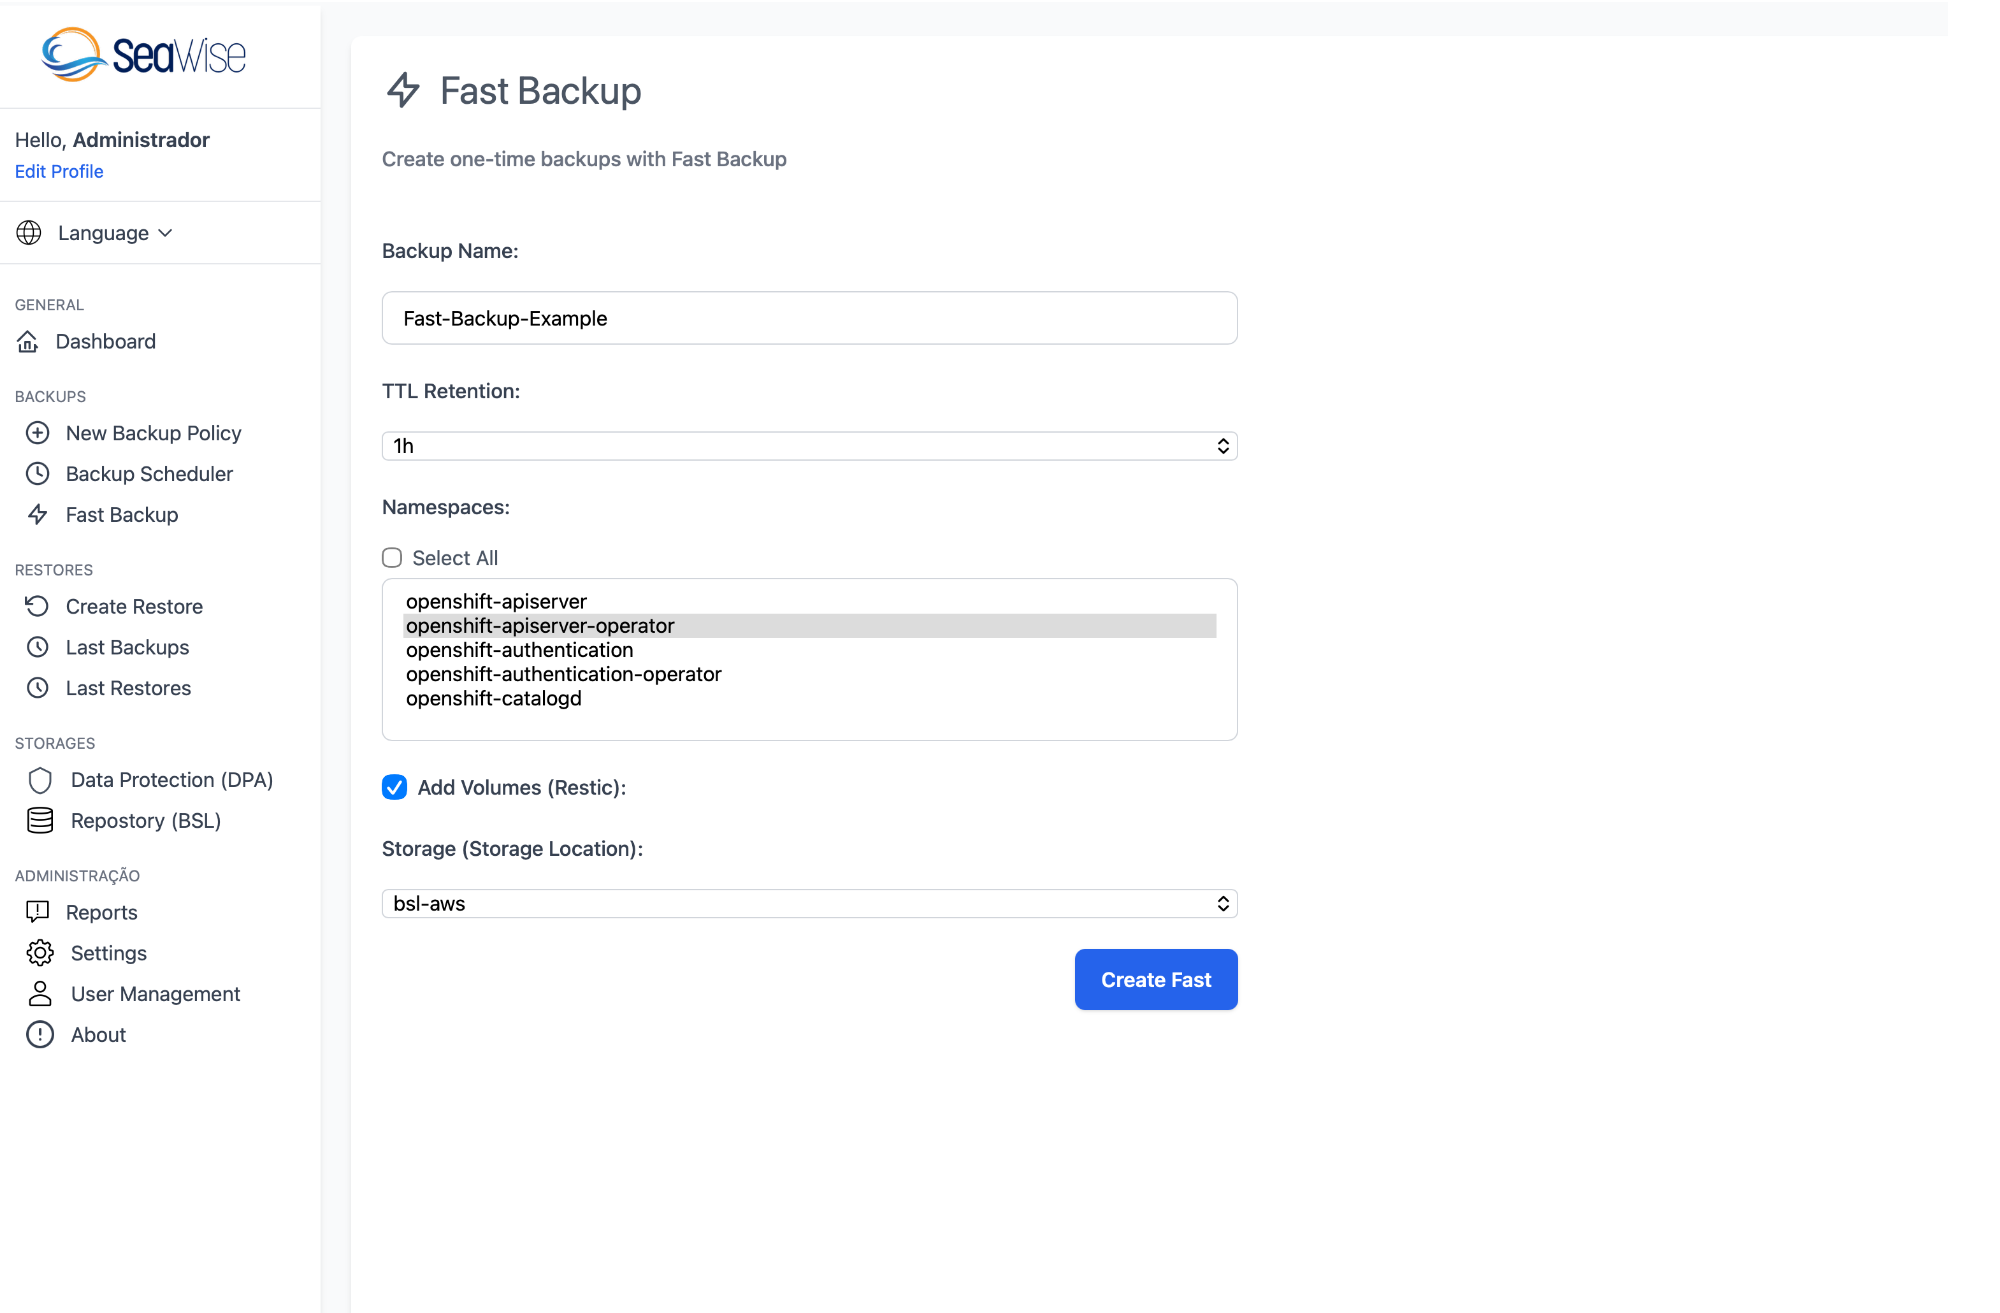
Form Fields
| Field | Description | Required |
|---|---|---|
| Backup Name | Unique name to identify the backup. Must follow Kubernetes standards (lowercase, hyphens) | Yes |
| Namespace(s) | One or more namespaces for backup. Select multiple namespaces using the control key | Yes |
| TTL (Time to Live) | Backup retention time. Format: 720h (30 days), 168h (7 days), etc. | No |
| Add Volumes Restic | To create backup of persistent volumes | No |
| Storage Location | Name of the storage location configured in Velero where the backup will be stored | No |
Backup Example
Schedules (Backup Policy)
Backup Policies allow you to automate the creation of periodic backups, ensuring continuous protection of your data without manual intervention.
How to Create a Backup Policy
- Access "New Backup Policy" in the side menu
- Fill in the form fields as described below
- Click on "Create Policy" to save
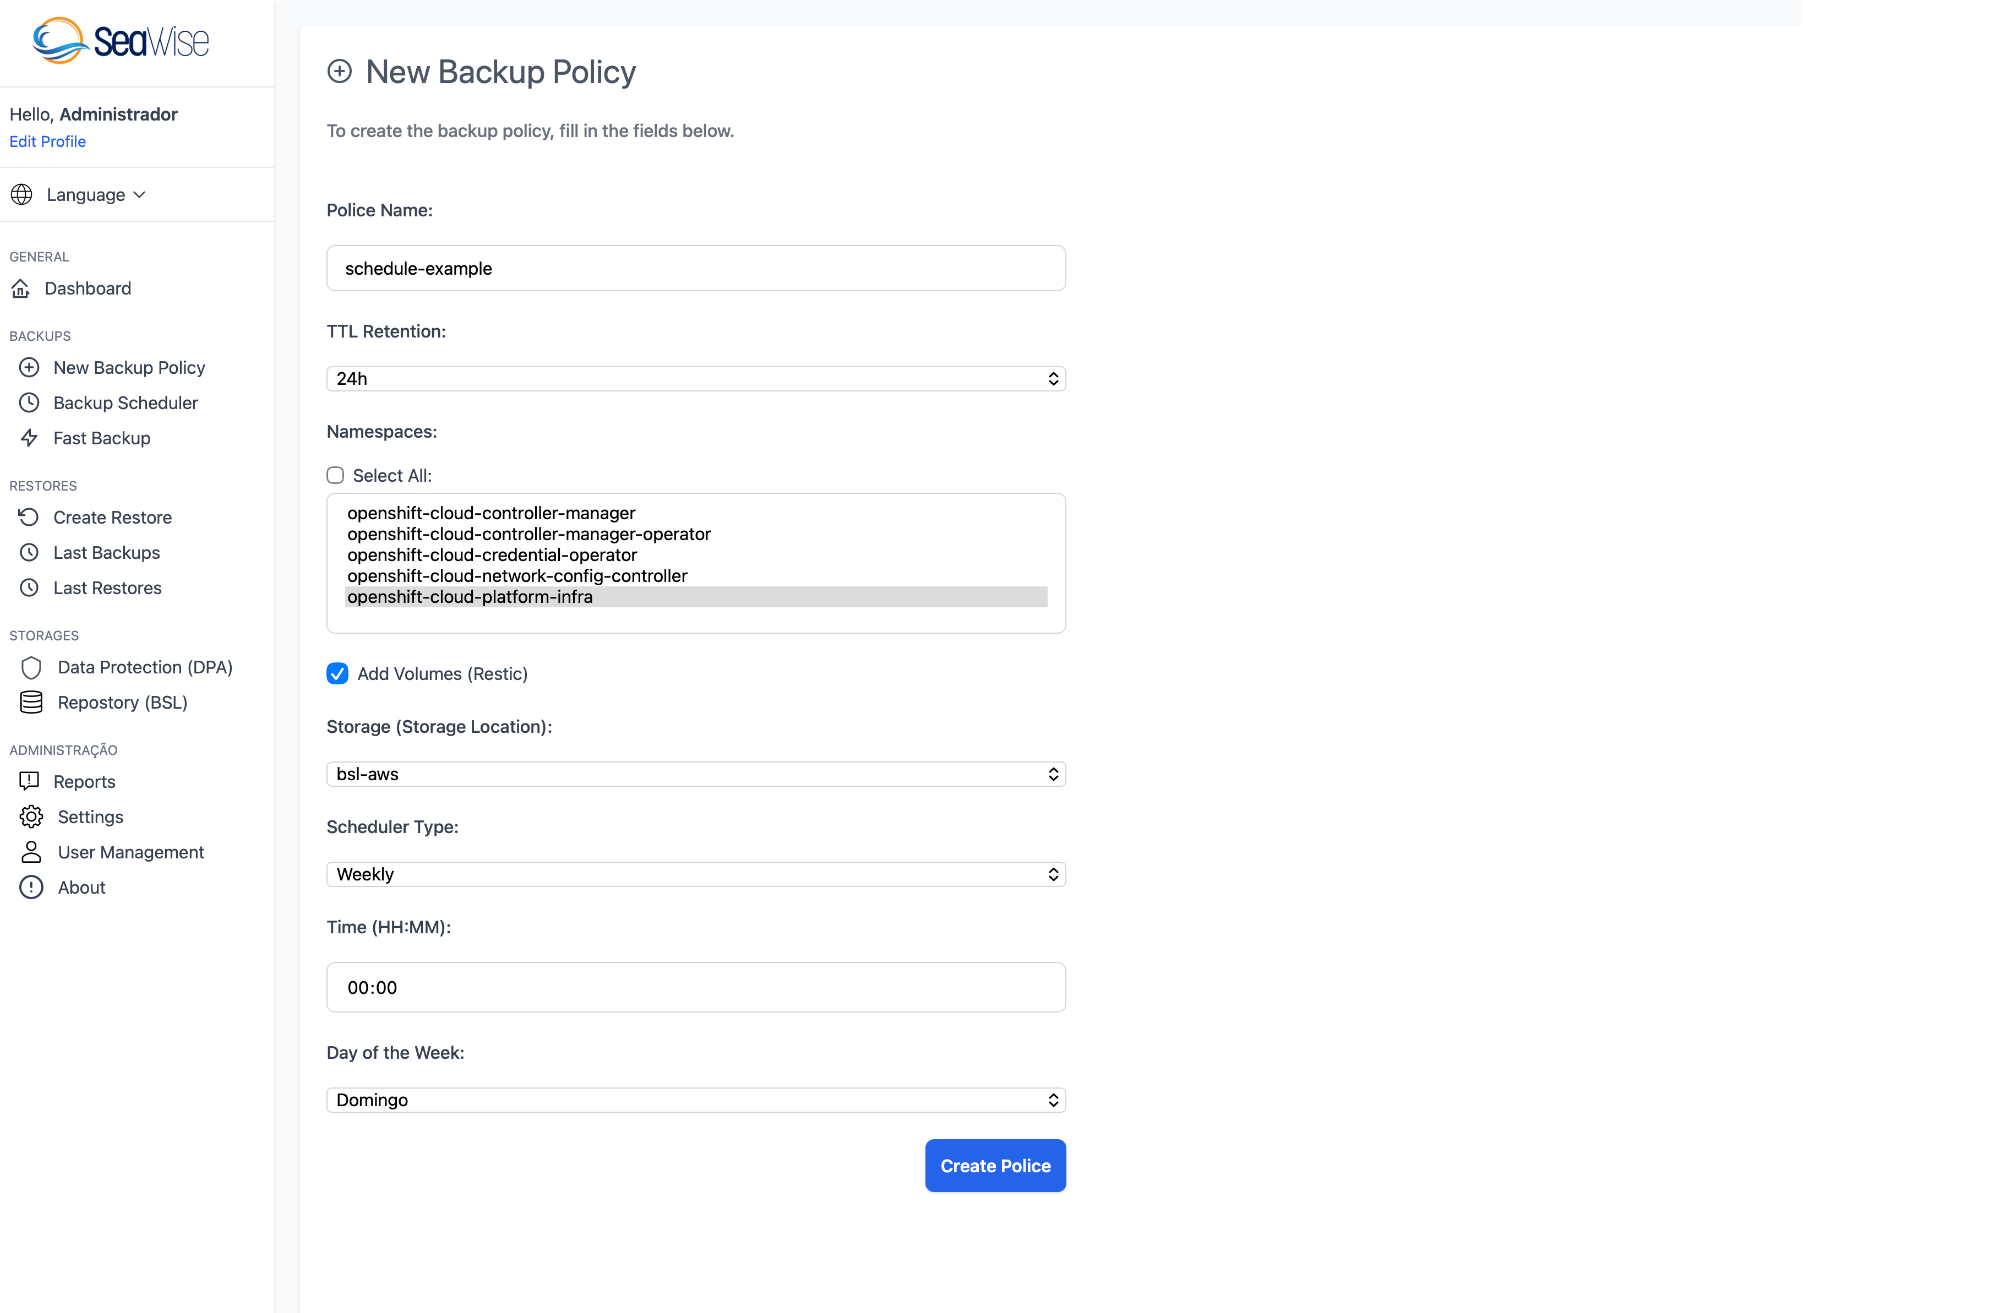
Configuration Fields
| Field | Description | Required |
|---|---|---|
| Policy Name | Unique name to identify the backup policy (e.g., schedule-example) | Yes |
| TTL Retention | Backup retention time. Options: 24h, 7 days, 15 days, 30 days, 60 days, 90 days | Yes |
| Namespaces | Select the namespaces to be included in the backup. Use Ctrl/Cmd to select multiple. Check "Select All" for all namespaces | Yes |
| Add Volumes (Restic) | Enable to include persistent volumes in the backup using Restic | No |
| Storage (Storage Location) | Select the configured storage location where backups will be saved (e.g., bsl-aws) | Yes |
| Scheduler Type | Backup frequency: Daily, Weekly, Monthly | Yes |
| Time (HH:MM) | Backup execution time in 24h format (e.g., 00:00, 14:30) | Yes |
| Day of the Week | Day of the week for weekly backup: Sunday, Monday, Tuesday, Wednesday, Thursday, Friday, Saturday | Yes (if Weekly) |
Schedule Types
| Type | Description | Configuration |
|---|---|---|
| Daily | Backup executed every day | Define only the time (HH:MM) |
| Weekly | Weekly backup on specific day | Define the time and day of the week |
| Monthly | Monthly backup on the first day of the month | Define only the time (HH:MM) |
Configuration Example
Policy Management
- View Policies: See all configured backup policies in the "Backup Scheduler" menu
- Edit Policy: Modify parameters of an existing policy
- Disable/Enable: Pause or resume a policy without deleting it
- Delete Policy: Remove the policy (already created backups are not affected)
- History: See all backups automatically created by each policy
Last Backups
The "Last Backups" page displays all recently created backups, allowing you to view details, filter, and create restores from them.
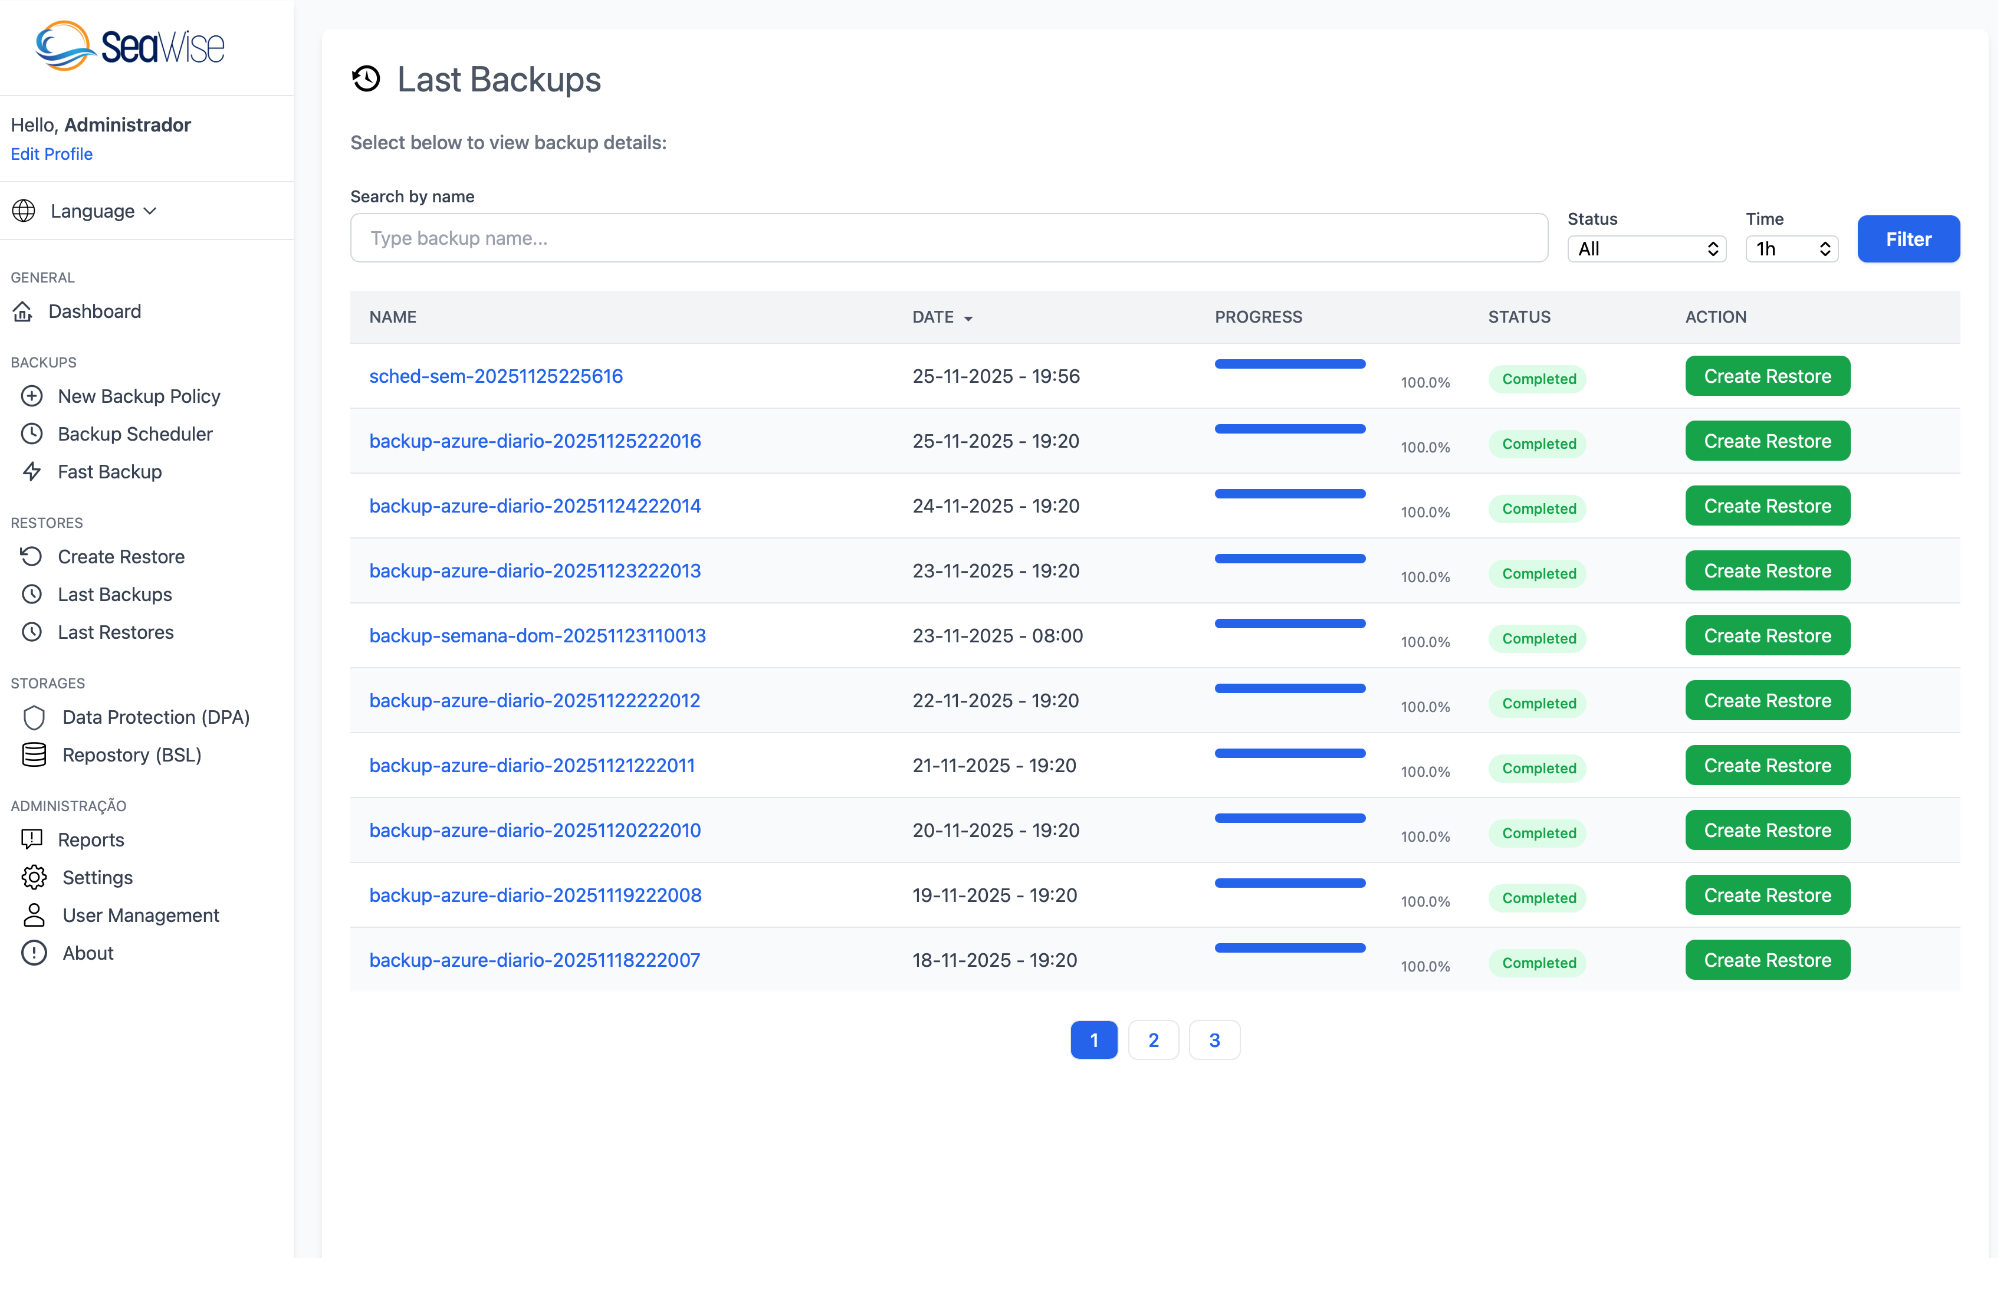
Features
Search and Filters
- Search by name: Search field to filter backups by name
- Status Filter: Filter by status (All, Completed, Failed, InProgress, etc.)
- Time Filter: Filter by period (1h, 24h, 7 days, 30 days, etc.)
- Filter Button: Apply the selected filters
Backups Table
The table displays detailed information about each backup:
| Column | Description |
|---|---|
| NAME | Backup name (clickable to view details). Examples: sched-sem-*, backup-azure-diario-* |
| DATE | Backup creation date and time (format: DD-MM-YYYY - HH:MM) |
| PROGRESS | Visual progress bar showing completion percentage (0% to 100%) |
| STATUS | Colored badge indicating the state: Completed, Failed, InProgress |
| ACTION | Green "Create Restore" button to start a restore from the backup |
Pagination
At the bottom of the table, you will find:
- Page navigation (1, 2, 3...)
- Current page indicator
- Controls to navigate between result pages
Available Actions
- View Details: Click on the backup name to see complete information (namespaces, resources, logs, etc.)
- Create Restore: Click the green button to start the restoration process from the selected backup
- Filter by Status: Use the "Status" dropdown to see only backups in a specific state
- Filter by Period: Use the "Time" dropdown to limit results by time interval
Backup Status
| Status | Color | Meaning |
|---|---|---|
| Completed | Green | Backup completed successfully (100%) |
| Failed | Red | Backup failed during execution |
| InProgress | Blue | Backup in progress |
| PartiallyFailed | Yellow | Backup completed with some errors |
View Details
When clicking on a backup name in the "Last Backups" table, you are directed to the backup details page, where you can view in-depth information about the backup operation.
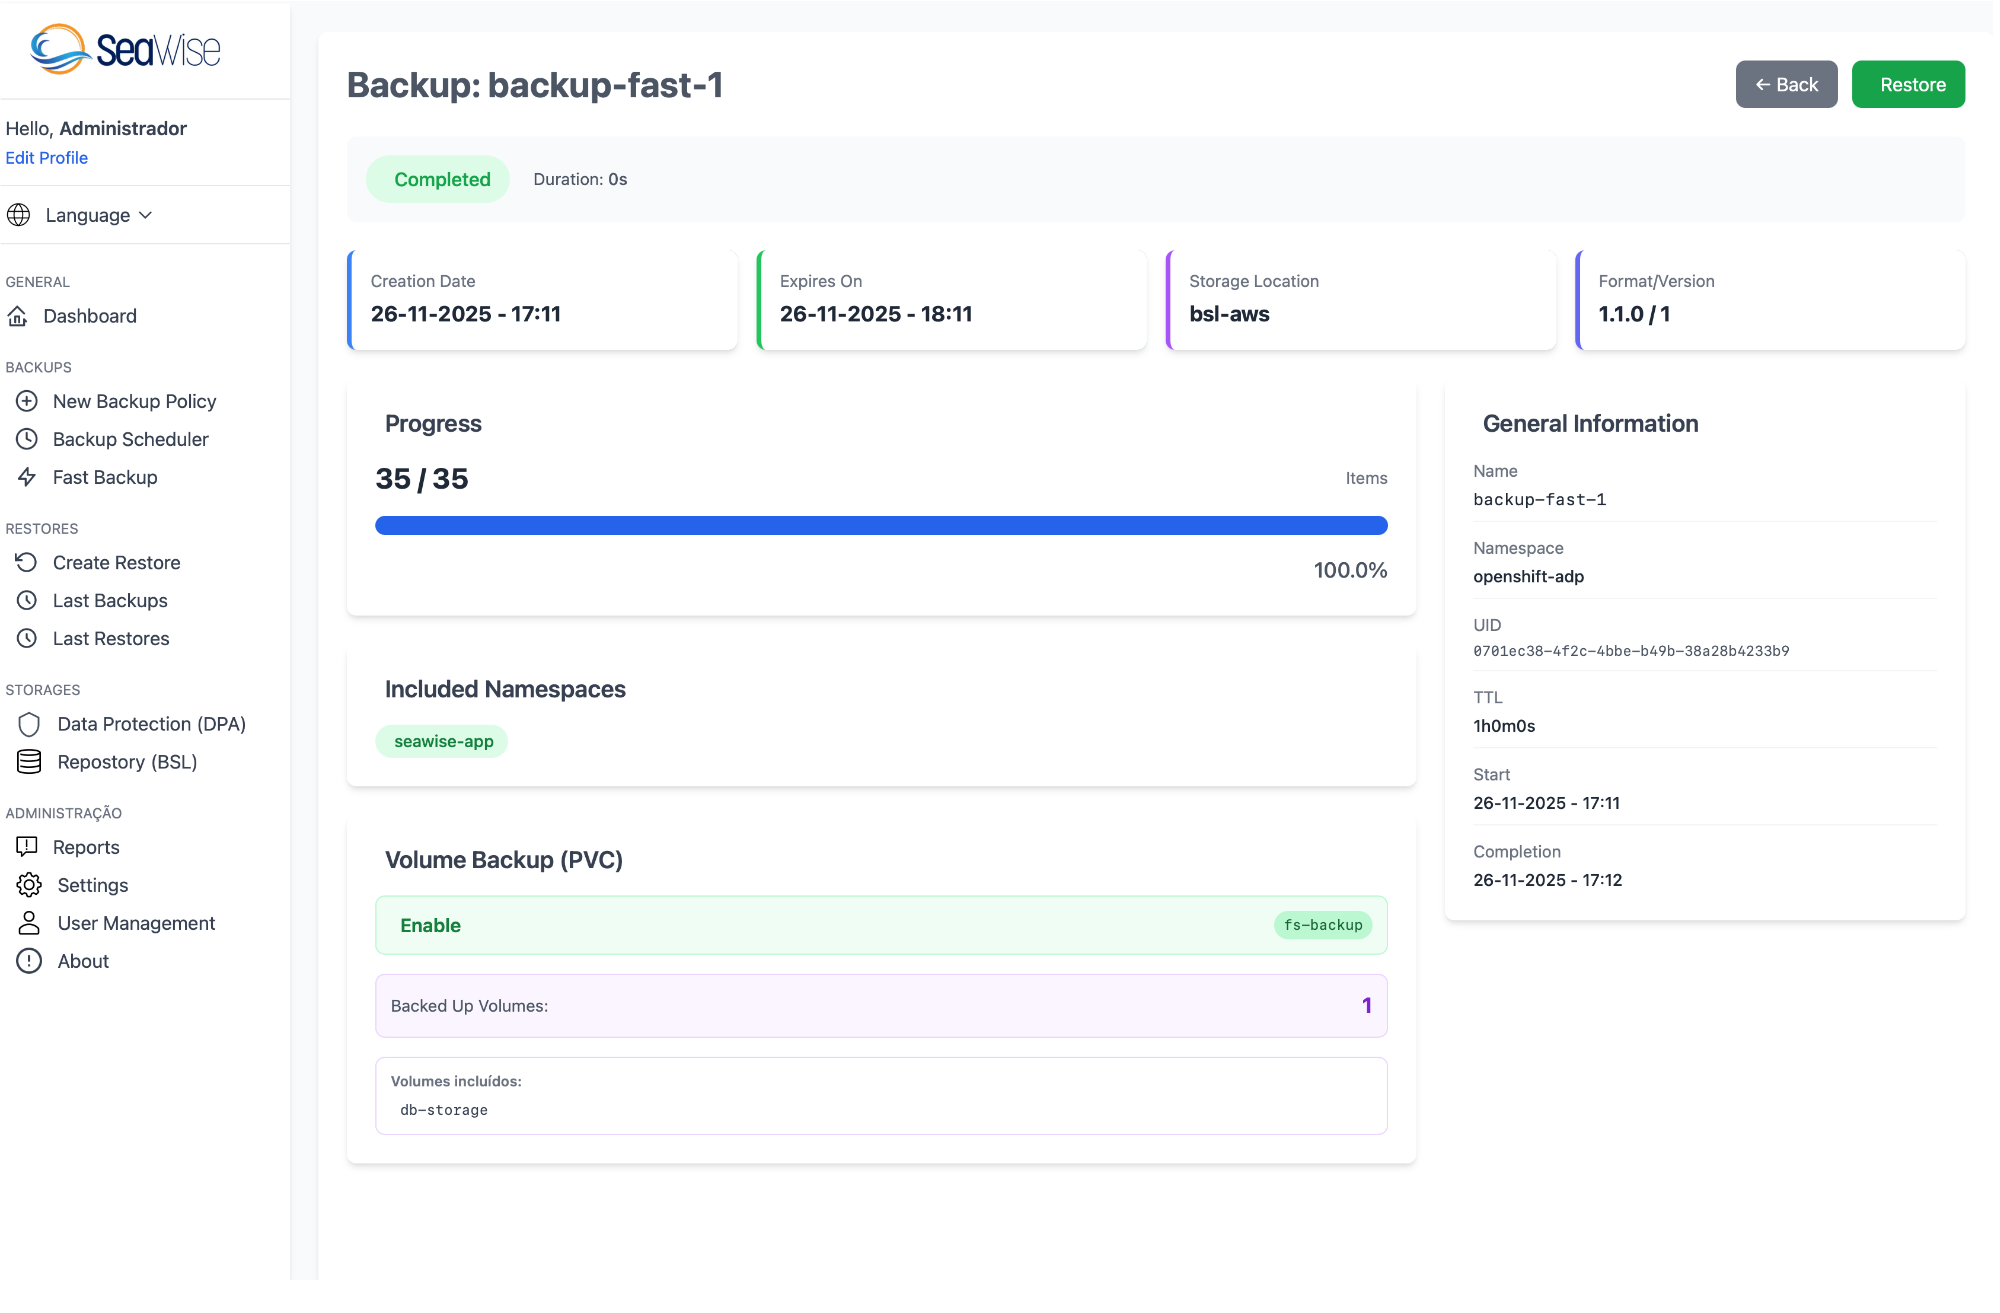
Main Information
At the top of the page, you will find cards with essential information:
| Field | Description |
|---|---|
| Creation Date | Exact date and time when the backup was created (format: DD-MM-YYYY - HH:MM) |
| Expires On | Backup expiration date and time according to configured TTL |
| Storage Location | Name of the BSL (Backup Storage Location) where the backup is stored (e.g., bsl-aws) |
| Format/Version | Velero backup format version (e.g., 1.1.0 / 1) |
| Status Badge | Green "Completed" or red "Failed" badge at the top of the page along with duration (Duration: 0s) |
Progress Section
Shows detailed backup progress:
- Item Count: Total number of resources processed (e.g., 35 / 35 Items)
- Progress Bar: Visual representation of completion percentage (100.0%)
- Bar Color: Blue for successful progress
General Information
Right sidebar panel with detailed backup information:
| Field | Description |
|---|---|
| Name | Complete backup name (e.g., backup-fast-1) |
| Namespace | Namespace where the Velero backup resource is located (e.g., openshift-adp) |
| UID | Unique backup identifier in Kubernetes (UUID) |
| TTL | Time to Live - Backup retention time (e.g., 1h0m0s for 1 hour) |
| Start | Backup start date and time (format: DD-MM-YYYY - HH:MM) |
| Completion | Backup completion date and time (format: DD-MM-YYYY - HH:MM) |
Included Namespaces
Lists the namespaces that were included in the backup. Each namespace is displayed as a green badge (e.g., "seawise-app"). If multiple namespaces were included, all will be listed in this section.
Volume Backup (PVC)
Information about persistent volume backup:
| Item | Description |
|---|---|
| Status Enable/Disable | Green "Enable" badge indicates that Restic is enabled for volume backup |
| Method | Green "fs-backup" badge indicates that File System Backup (Restic) method was used |
| Backed Up Volumes | Number of volumes that were successfully backed up (e.g., 1 volume) |
| Included Volumes | Detailed list of backed up volume names (e.g., "db-storage") |
Actions on Details Page
- "← Back" Button: Returns to the backup list
- "Restore" Button (green): Starts the restoration process using this backup as source
Tip
The details page is useful for auditing specific backups, verifying which namespaces and volumes were included, and confirming that the backup was completed successfully before starting a restore operation.
Tip
Use time filters to quickly find specific backups. For example, select "24h" to see only backups from the last 24 hours, making it easier to identify the most recent backups.
Restore
The Restore functionality allows you to recover Kubernetes resources from previously created backups. The process is simple and intuitive through the "Create Restore" form.
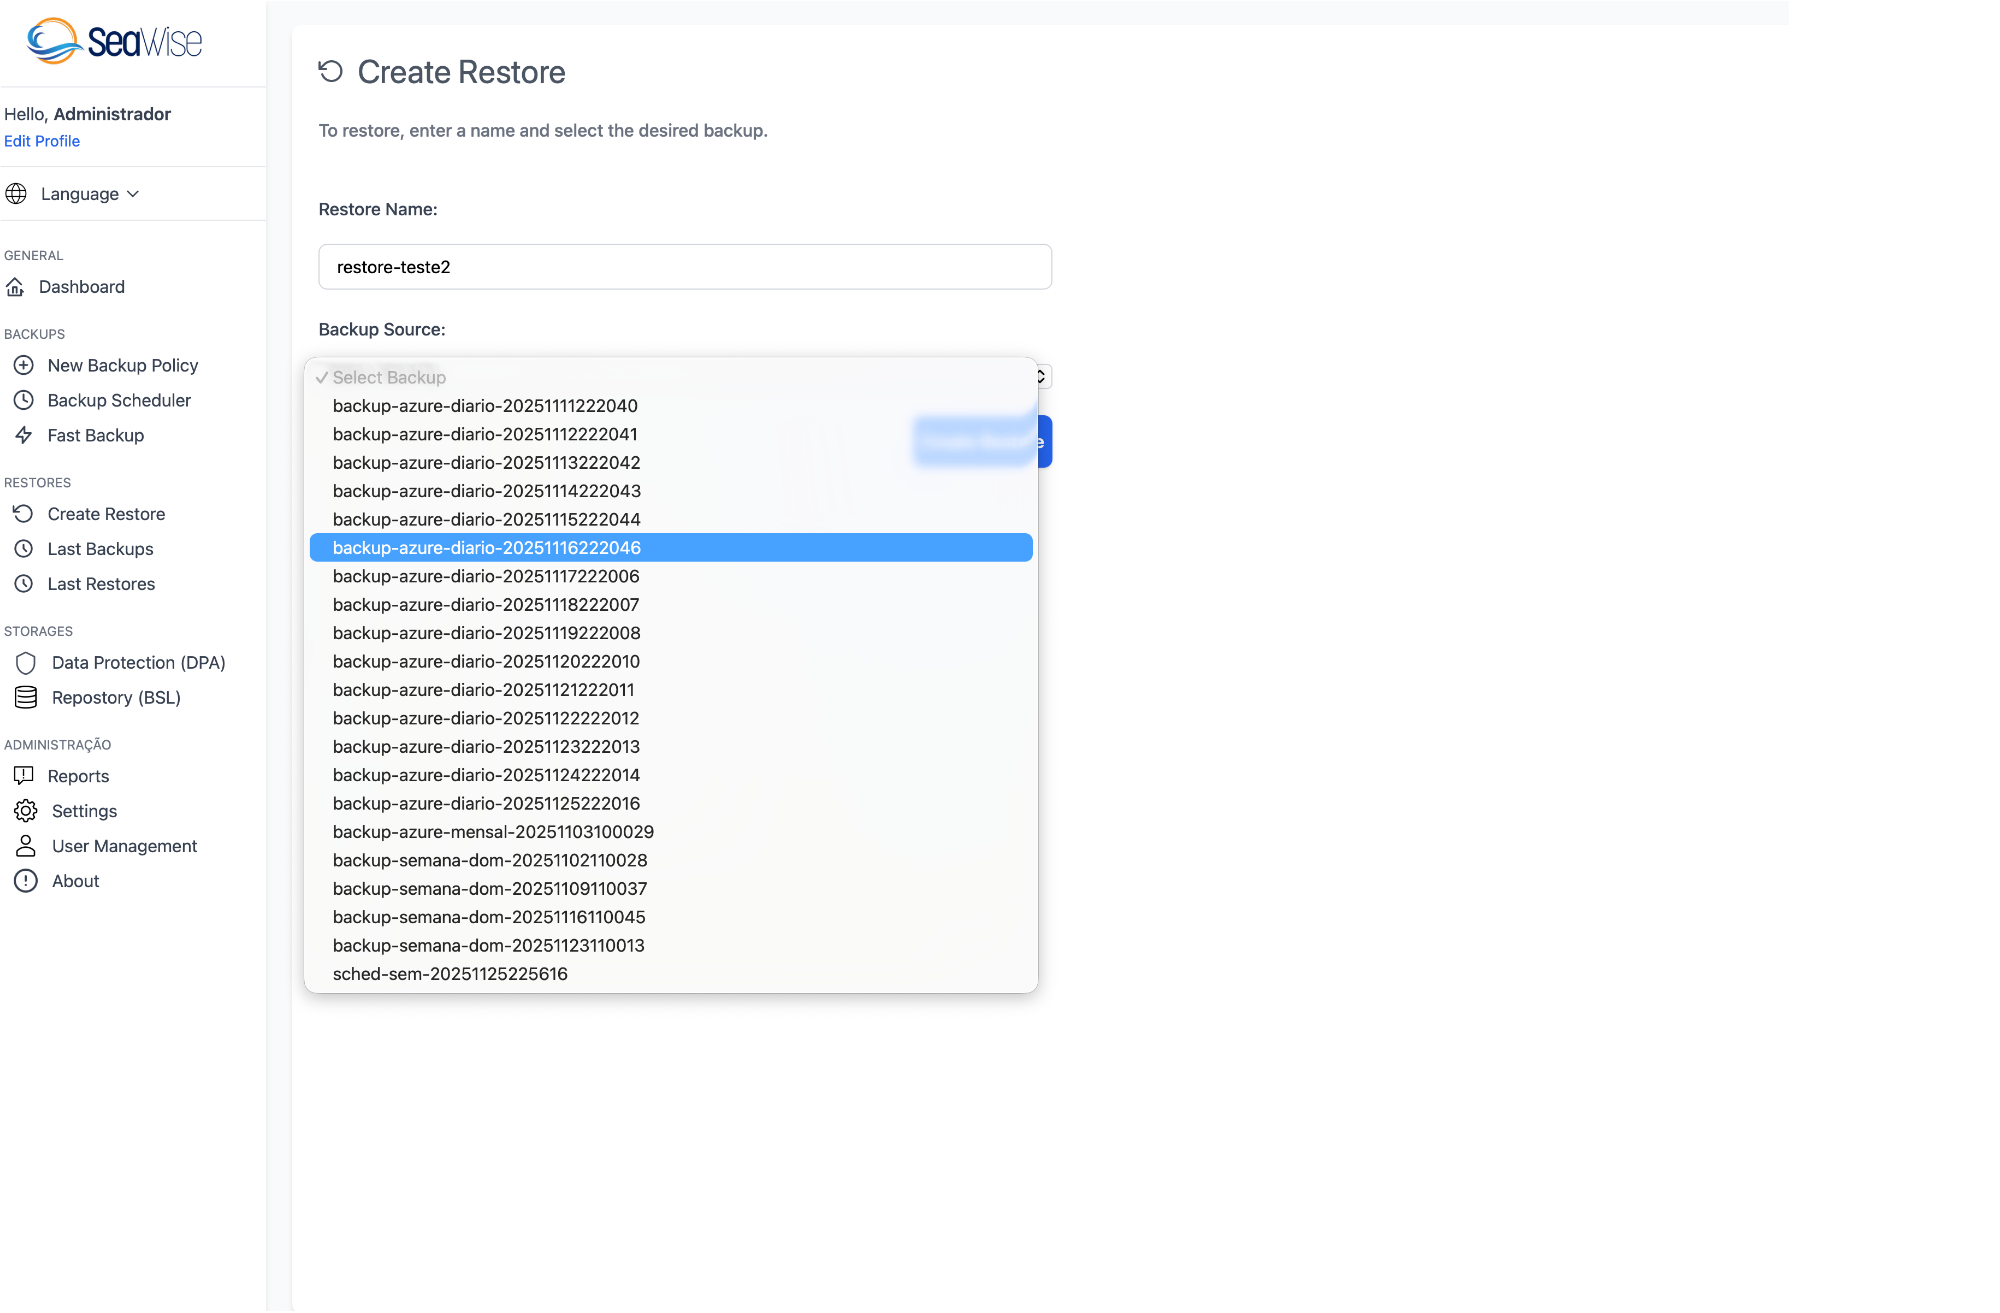
How to Create a Restore
To restore a backup, follow the steps below:
- Access the "Create Restore" menu in the left sidebar
- Fill in the Restore Name field with a unique name to identify the restore operation
- Select the source backup in the Backup Source field
- Click the "Create Restore" button to start the restoration
Form Fields
| Field | Description | Required |
|---|---|---|
| Restore Name | Unique name to identify the restore operation. Must follow Kubernetes standards (lowercase, hyphens) | Yes |
| Backup Source | Selection of the backup to be restored. The dropdown displays all available backups ordered by date | Yes |
Backup Selection
The Backup Source field presents a dropdown list with all available backups. Backups are displayed with their complete names that include:
- Backup name: Unique backup identifier
- Date: Backup creation date and time (format: YYYYMMDDHHMMSS)
- Source: Indicates the backup source (e.g., azure-diario, mensal, semanal, scheduler)
Backup name examples:
backup-azure-diario-20251118222046backup-azure-mensal-20251103100029backup-semana-dom-20251102110028sched-sem-202511.6.15616
Restoration Process
After creating the restore:
- Automatic Execution: Velero/OADP automatically starts the restoration process
- Monitoring: Track progress in the "Last Restores" section of the Dashboard or on the "Last Restores" page
- Notification: Status will be updated automatically (Completed, Failed, InProgress)
- Verification: After completion, verify the restored resources in the cluster
Restore Status
| Status | Color | Meaning |
|---|---|---|
| Completed | Green | Restore completed successfully |
| Failed | Red | Restore failed during execution |
| InProgress | Blue | Restore in progress |
| PartiallyFailed | Yellow | Restore completed with some errors |
Tip
The Backup Source dropdown displays all available backups. Use the scroll bar to navigate the complete list. Select the most recent backup or a specific backup according to your restoration needs.
Caution
Be careful when restoring in production environments. Restored resources can overwrite existing resources. Always test restores in development environments first and verify that the selected backup is really the desired one.
Last Restores
The "Last Restores" page displays all recently executed restores, allowing you to view the restoration history and their status.

Features
Search and Filters
- Search by name: Search field to filter restores by name
- Status Filter: Filter by status (All, Completed, Failed, InProgress, etc.)
- Time Filter: Filter by period (1h, 24h, 7 days, 30 days, etc.)
- Filter Button: Apply the selected filters
Restores Table
The table displays detailed information about each restore:
| Column | Description |
|---|---|
| NAME | Restore name (clickable to view details). Examples: restore-new, restore-teste |
| DATE | Restore execution date and time (format: DD-MM-YYYY - HH:MM) |
| PROGRESS | Visual progress bar showing completion percentage (0% to 100%) |
| STATUS | Colored badge indicating the state: Completed, Failed, InProgress |
Pagination
At the bottom of the table, you will find:
- Page navigation (1, 2, 3...)
- Current page indicator
- Controls to navigate between result pages
Available Actions
- View Details: Click on the restore name to see complete information (source backup, restored namespaces, resources, logs, etc.)
- Filter by Status: Use the "Status" dropdown to see only restores in a specific state
- Filter by Period: Use the "Time" dropdown to limit results by time interval
Restore Status
| Status | Color | Meaning |
|---|---|---|
| Completed | Green | Restore completed successfully (100%) |
| Failed | Red | Restore failed during execution |
| InProgress | Blue | Restore in progress |
| PartiallyFailed | Yellow | Restore completed with some resources that could not be restored |
Tip
Regularly monitor the "Last Restores" page to verify the success of restoration operations. Restores with "PartiallyFailed" or "Failed" status should be investigated to identify possible issues with incompatible resources or permissions.
Storage Locations
Storage Locations define where backups will be stored. Seawise supports several S3-compatible storage providers.
Supported Providers
- AWS S3
- MinIO
- Google Cloud Storage (S3 compatibility)
- Azure Blob Storage (S3 compatibility)
- Other S3-compatible providers
Configuring a Storage Location
1. AWS S3
velero backup-location create aws-s3 \
  --provider aws \
  --bucket my-velero-bucket \
  --config region=us-east-1 \
  --credential-file ./credentials-velero
2. MinIO
velero backup-location create minio \
  --provider aws \
  --bucket velero-backups \
  --config region=minio,s3ForcePathStyle="true",s3Url=http://minio.example.com:9000 \
  --credential-file ./minio-credentials
Management via Seawise
Through the Seawise interface, you can:
- List: View all configured storage locations
- Create: Add new storage locations
- Edit: Modify existing configurations
- Validate: Test connectivity with storage
- Set as Default: Define which storage location will be used by default
- Delete: Remove storage locations (requires no active backups)
Configuration Fields
| Field | Description |
|---|---|
| Name | Unique name to identify the storage location |
| Provider | Storage provider (aws, gcp, azure, etc.) |
| Bucket | Bucket name where backups will be stored |
| Region | Storage provider region |
| Credentials | Credentials file for storage access |
| Config | Additional provider-specific settings |
Reports
The Reports section offers a complete analysis of the backup and restore environment, allowing you to view metrics, statistics, and detailed lists in a single unified interface.
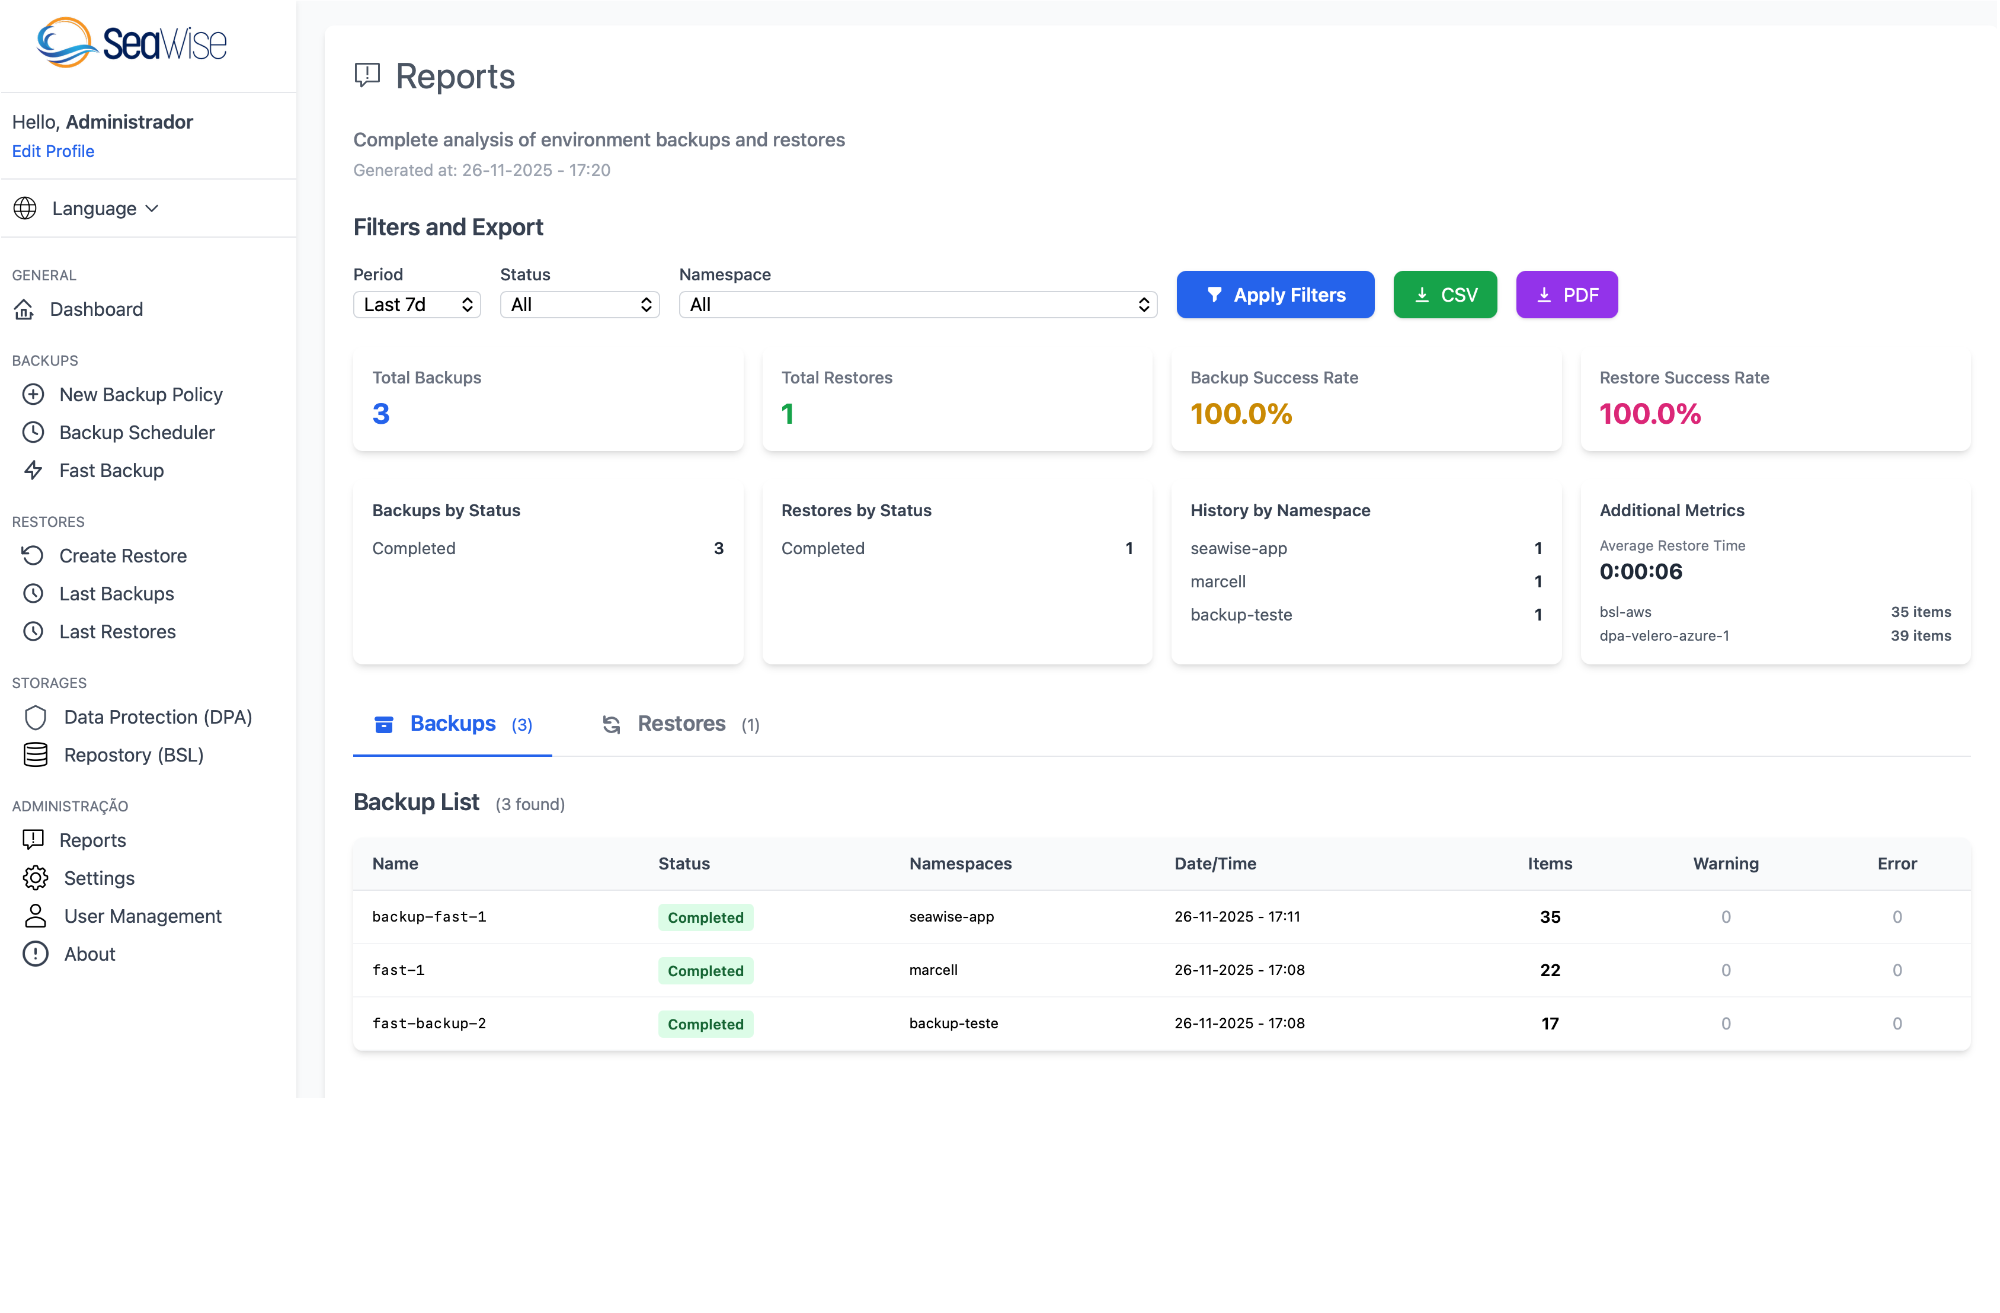
Overview
The report presents a complete analysis of the backup and restore environment with:
- Title: "Complete analysis of environment backups and restores"
- Timestamp: Report generation date and time (e.g., Generated at: 26-11-2025 - 17:20)
- Customizable Filters: Period, Status, and Namespace
- Export: Buttons to export in CSV or PDF
Filters and Export
At the top, you will find filtering and export tools:
| Filter/Button | Description | Options |
|---|---|---|
| Period | Filters data by time period | Last 7d, Last 30d, Last 90d, etc. |
| Status | Filters by operation status | All, Completed, Failed, InProgress |
| Namespace | Filters by specific namespace | All, seawise-app, marcell, backup-teste, etc. |
| Apply Filters | Blue button with funnel icon to apply selected filters | - |
| CSV | Green button to export data in CSV format (spreadsheet) | - |
| Purple button to export report in PDF format (document) | - |
Main Metrics
Four main cards display summary statistics:
| Metric | Description | Example |
|---|---|---|
| Total Backups | Total number of backups in the filtered period | 3 |
| Total Restores | Total number of restores executed in the period | 1 |
| Backup Success Rate | Backup success rate in percentage (orange color) | 100.0% |
| Restore Success Rate | Restore success rate in percentage (pink/magenta color) | 100.0% |
Analysis Panels
Below the main metrics, four panels provide detailed analysis:
1. Backups by Status
Lists the number of backups grouped by status:
- Completed: Number of successfully completed backups (e.g., 3)
- Failed: Number of failed backups (if any)
- InProgress: Number of backups in progress (if any)
2. Restores by Status
Lists the number of restores grouped by status:
- Completed: Number of completed restores (e.g., 1)
- Failed: Number of failed restores (if any)
- InProgress: Number of restores in progress (if any)
3. History by Namespace
Shows the history of operations grouped by namespace:
- Namespace name (e.g., seawise-app, marcell, backup-teste)
- Number of operations performed in each namespace (e.g., 1 backup each)
- Allows identifying which namespaces are being backed up more frequently
4. Additional Metrics
Important complementary metrics:
- Average Restore Time: Average restore duration time (e.g., 0:00:06)
- BSL Information: List of Backup Storage Locations with item count:
- bsl-aws: 35 items
- dpa-velero-azure-1: 39 items
View Tabs
Just below the analysis panels, you will find two tabs to switch between views:
| Tab | Description | Counter |
|---|---|---|
| Backups | Active tab (blue) showing detailed list of backups | (3) - Number of backups found |
| Restores | Tab to view detailed list of restores | (1) - Number of restores found |
Backup List (3 found)
When the "Backups" tab is active, a detailed table displays all backups found with the applied filters:
| Column | Description |
|---|---|
| Name | Backup name (e.g., backup-fast-1, fast-1, fast-backup-2) |
| Status | Green "Completed" or red "Failed" badge indicating backup state |
| Namespaces | Namespace(s) included in the backup (e.g., seawise-app, marcell, backup-teste) |
| Date/Time | Backup creation date and time (format: DD-MM-YYYY - HH:MM) |
| Items | Number of resources/items included in the backup (e.g., 35, 22, 17) |
| Warning | Number of warnings during backup (usually 0) |
| Error | Number of errors during backup (usually 0 for Completed) |
Report Use Cases
Audit and Compliance
- Verify backup and restore success rate
- Identify namespaces without recent backup
- Generate backup evidence for audits
- Export reports in PDF for documentation
Troubleshooting
- Identify failed backups through Status filter
- Analyze Warning and Error for diagnosis
- Check average restore time
- Compare performance between different BSLs
Capacity Analysis
- View how many items are being backed up per namespace
- Compare backup distribution between BSLs
- Identify namespaces with more backup operations
Data Export
- CSV: Ideal for analysis in Excel, Google Sheets, or BI tools
- PDF: Perfect for executive reports, documentation, and presentations
Tip
Use combined filters for specific analysis. For example, select "Last 7d" + Status "Failed" to quickly identify recent issues. Export to CSV to create custom dashboards in external tools.
Automatic Update
The "Generated at" timestamp shows when the report was generated. To update the data, apply the filters again or reload the page.
User Management
The user management system allows you to control access to Seawise with different permission levels.
Creating New Users
Required Permission
Only users with admin role can create, edit, or delete other users.
- Access "Users" in the menu
- Click on "New User"
- Fill in user data
- Select the appropriate role
- Save the new user
User Fields
| Field | Description | Required |
|---|---|---|
| Username | Unique username for login | Yes |
| Valid email address | Yes | |
| Full Name | User's full name | No |
| Password | Strong password with minimum 8 characters | Yes |
| Role | Permission level (admin, backup, viewer) | Yes |
| Active | Whether the user is active or blocked | Yes |
Permission Management
Admin
- ✓ Create, edit, and delete users
- ✓ Manage all system settings
- ✓ Configure storage locations and DPA
- ✓ Create, edit, and delete backups
- ✓ Perform restores
- ✓ View all reports
Backup
- ✗ Cannot manage users
- ✗ Cannot change system settings
- ✗ Cannot configure storage locations
- ✓ Create, edit, and delete backups
- ✓ Perform restores
- ✓ View operational reports
Viewer
- ✗ Cannot manage users
- ✗ Cannot change settings
- ✗ Cannot create backups
- ✗ Cannot perform restores
- ✓ View dashboard
- ✓ View reports (read-only)
Password Security
Seawise implements the following security measures:
- Passwords are stored with bcrypt hash
- Minimum 8 characters required
- Strong password recommendation (uppercase, lowercase, numbers, symbols)
- Automatic lockout after multiple failed login attempts
- Sessions expire after period of inactivity
Settings
The Settings page allows you to adjust essential Seawise parameters for the correct functioning of the application.
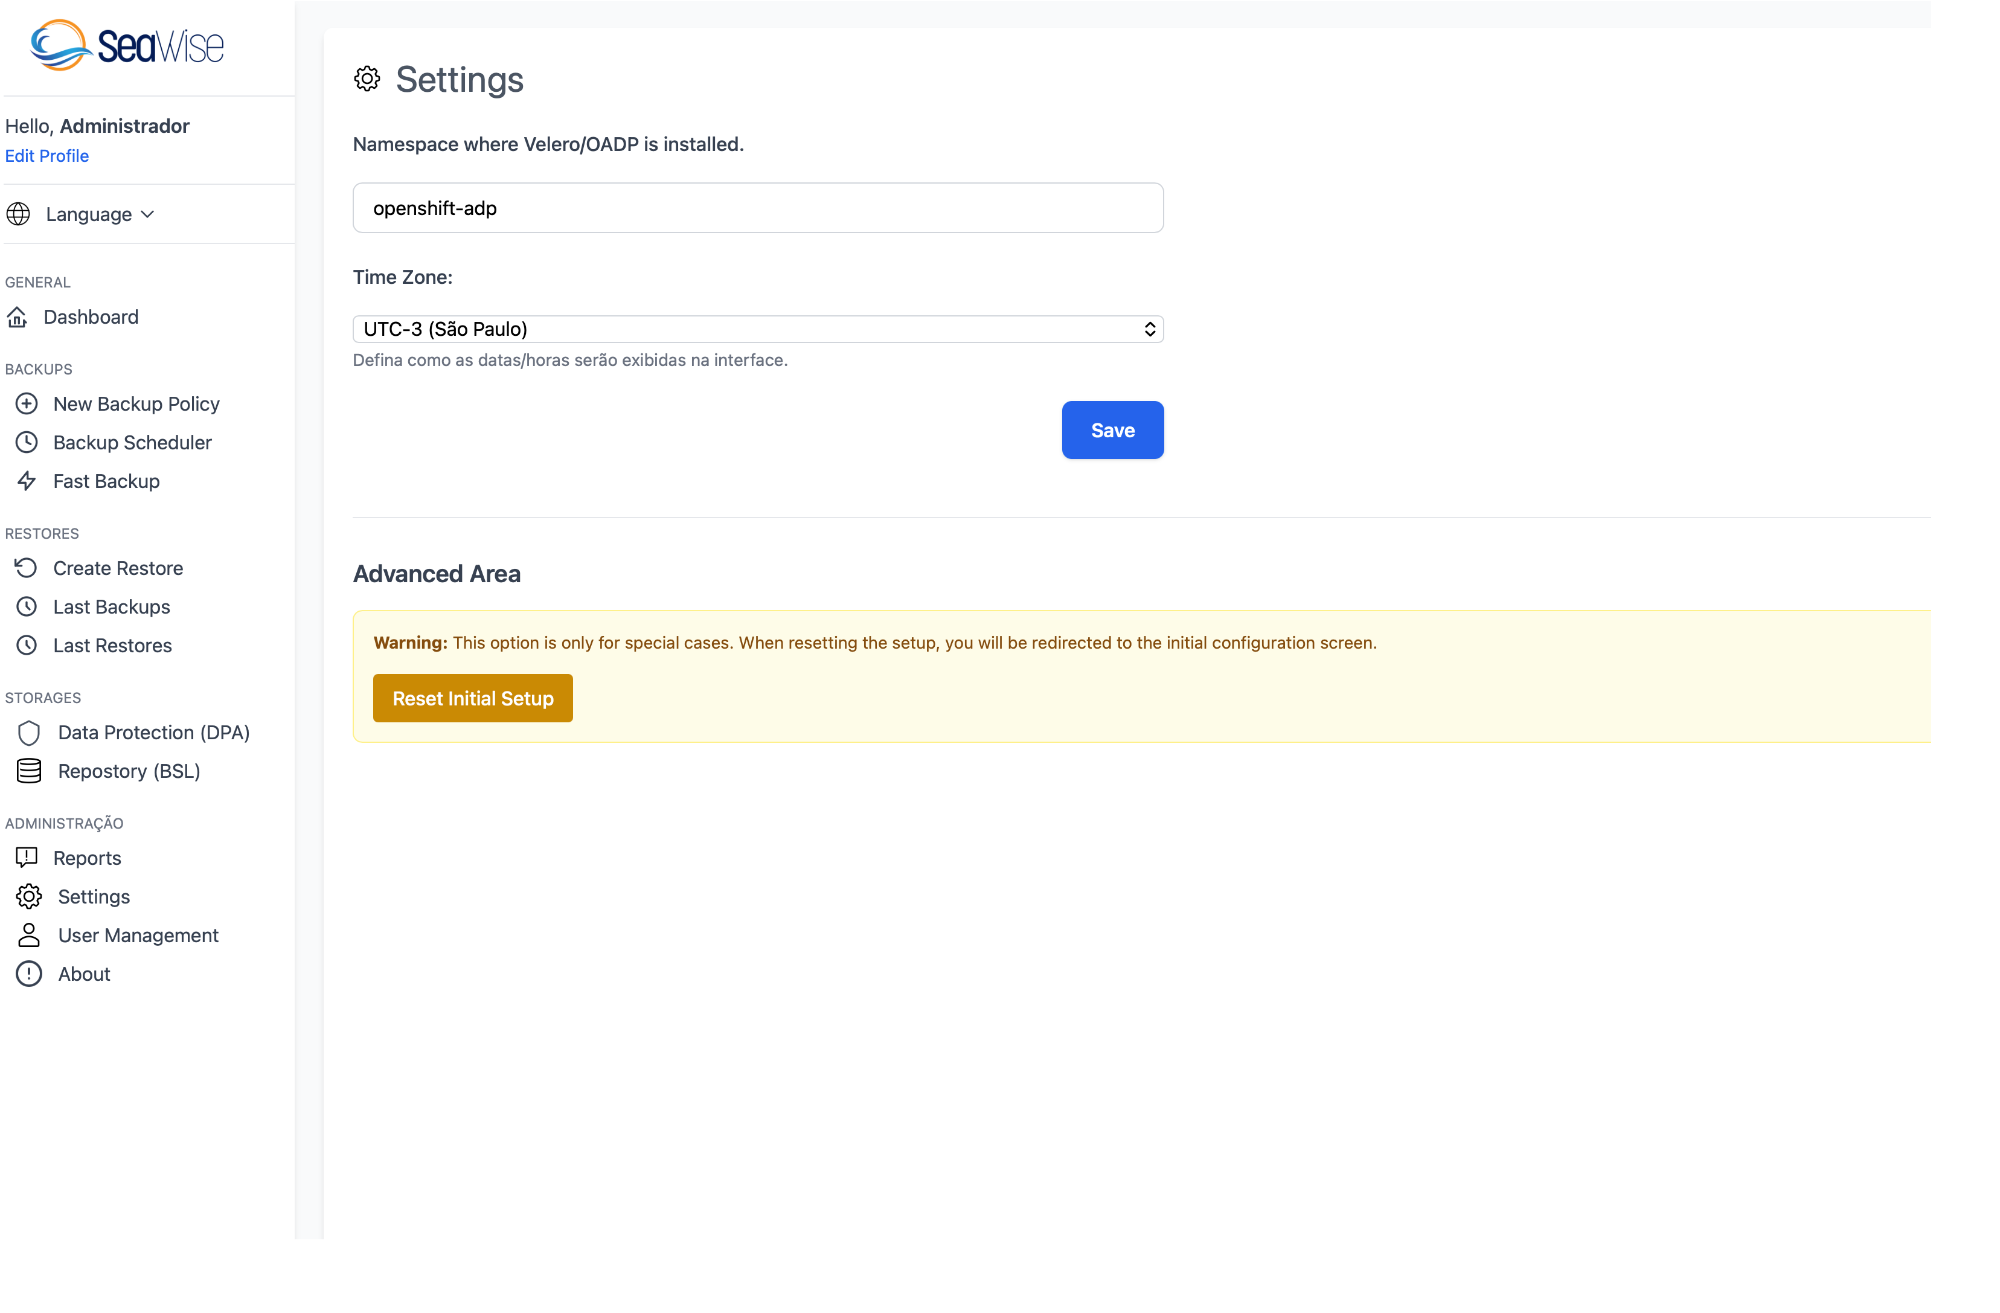
Velero/OADP Namespace
This field defines the namespace where Velero or OADP is installed in your Kubernetes/OpenShift cluster. It is the most important setting for Seawise to communicate correctly with Velero.
| Field | Description | Example |
|---|---|---|
| Namespace where Velero/OADP is installed | Kubernetes namespace name where Velero or OADP was installed. Seawise needs this information to access backup/restore resources | openshift-adp (OpenShift), velero (Kubernetes/Rancher) |
How to Identify the Correct Namespace
OpenShift with OADP:
oc get deployment --all-namespaces | grep velero
# Usually: openshift-adp
Kubernetes/Rancher with Velero:
kubectl get deployment --all-namespaces | grep velero
# Usually: velero
Important
The namespace configured here must match the namespace where you installed Velero or OADP. If the namespace is incorrect, Seawise will not be able to list backups, restores, or create new operations.
Time Zone
Configure the time zone for correct display of dates and times in the Seawise interface.
| Field | Description | Example |
|---|---|---|
| Time Zone | Time zone used to display dates and times throughout the interface. Select the timezone that corresponds to your region | UTC-3 (São Paulo), UTC+0 (London), UTC-5 (New York) |
Interface description: "Defines how dates/times will be displayed in the interface."
Common Timezones
- UTC-3 (São Paulo): Brasília Time (Brazil)
- UTC-5 (New York): Eastern Time (USA)
- UTC-8 (Los Angeles): Pacific Time (USA)
- UTC+0 (London): Greenwich Mean Time
- UTC+1 (Paris): Central European Time
- UTC+8 (Singapore): Singapore Time
Tip
The timezone setting affects the display of all dates and times in Seawise, including:
- Backup creation timestamps
- Expiration dates (TTL)
- Schedule execution times
- Reports and logs
Saving Settings
After filling in or changing the fields, click the blue "Save" button to apply the settings.
Caution
Changing the Velero/OADP namespace after initial configuration may cause Seawise to lose access to existing backups and restores. Make sure to configure the correct namespace in the initial installation.
Advanced Area
The "Advanced Area" section contains advanced options that should only be used in special cases:
Reset Initial Setup
Warning
This option is for special cases only. When resetting the setup, you will be redirected to the initial configuration screen.
The orange "Reset Initial Setup" button allows you to restart the Seawise configuration from scratch. Use only when:
- You have completely changed the cluster infrastructure
- You need to reconfigure Velero/OADP in a different namespace
- You are experiencing serious configuration problems that cannot be resolved otherwise
Internationalization (i18n)
Seawise offers full support for multiple languages, facilitating use by international teams.
Available Languages
- Portuguese (pt_BR): Brazilian Portuguese
- English (en): English
How to Switch Languages
- Click on the language selector in the upper right corner
- Select the desired language (EN or PT)
- The interface will be updated immediately
- Your preference will be saved for future sessions
Security
Seawise implements several security layers to protect your data and operations.
Authentication
- Encrypted Passwords: All passwords are stored with bcrypt hash
- Secure Sessions: Session cookies with HttpOnly and Secure flags
- CSRF Protection: Protection against Cross-Site Request Forgery
- Rate Limiting: Request limits to prevent brute force
Authorization
- Role-Based Access Control (RBAC): Granular role system
- Permission Verification: Each action verifies user permissions
- Audit: All actions are logged with timestamp and user
Communication
- HTTPS Required: All communication must use TLS/SSL
- Secure Headers: Security headers configured (HSTS, X-Frame-Options, etc.)
- API Token: Secure tokens for external integrations
Data
- Kubernetes Credentials: Stored securely via kubeconfig
- Secrets: Never exposed in logs or interface
- Sanitization: Inputs sanitized to prevent injection attacks
Security Recommendations
Best Practices
- Always use HTTPS in production
- Change the default SECRET_KEY
- Use strong passwords for all users
- Keep backups of credentials in a secure location
- Configure network policies in Kubernetes
- Use Kubernetes RBAC to limit access to Seawise
- Review audit logs regularly
- Keep Seawise and Velero always updated
Troubleshooting
Problem: Backups Stuck in "InProgress" Status
Possible Causes:
- Velero stuck or with issues
- Storage connectivity problems
- Very large resources taking time to backup
Solution:
# Check Velero logs
kubectl logs -n velero deployment/velero

# Check backup status
velero backup describe <backup-name> --details

# Check Velero pods
kubectl get pods -n velero
Problem: Error Connecting to Storage
Possible Causes:
- Invalid or expired credentials
- Bucket does not exist or without permissions
- Network/firewall configuration
Solution:
# Validate storage location
velero backup-location get

# Test connectivity manually
aws s3 ls s3://bucket-name --region us-east-1

# Check credentials secret
kubectl get secret -n velero cloud-credentials -o yaml
Problem: Restore Failing
Possible Causes:
- Resources already exist in the cluster
- Kubernetes version incompatibility
- CRDs not installed
Solution:
# View restore details
velero restore describe <restore-name> --details

# View restore logs
velero restore logs <restore-name>

# Restore with namespace mapping
velero restore create --from-backup <backup> \
  --namespace-mappings old:new
Problem: Seawise Doesn't Show Backups
Possible Causes:
- Seawise without permissions to access Velero namespace
- Velero not installed or running
- Incorrect VELERO_NAMESPACE configuration
Solution:
# Check if Velero is running
kubectl get pods -n velero

# Check if backups exist
velero backup get

# Check Seawise environment variable
echo $VELERO_NAMESPACE

# Check permissions
kubectl auth can-i get backups.velero.io --namespace velero
Problem: Login Not Working
Possible Causes:
- Corrupted database
- Incorrect password
- Account locked due to failed attempts
Solution:
# Reset password via CLI (if available)
python manage.py reset-password <username>

# Check application logs
tail -f logs/seawise.log

# Check database
sqlite3 data/seawise.db "SELECT username, active FROM users;"
Problem: Schedules Not Running
Possible Causes:
- Invalid cron expression
- Schedule paused
- Velero not processing schedules
Solution:
# Check schedule status
velero schedule describe <schedule-name>

# View next scheduled execution
velero schedule get

# Check Velero logs
kubectl logs -n velero deployment/velero | grep schedule
Get Support
If you continue experiencing problems:
- Consult the official Velero documentation
- Open an issue on the Seawise repository
- Include relevant logs, software versions, and steps to reproduce the problem
Tip
To report bugs or contribute to the project, visit our GitHub repository.